Download a full score and parts for all 7 keys
This is a complete set of parts for all instruments (300+ PDF pages)
The Purpose of this Book
This book was created in order to be used as a source for daily warm-ups. As a middle school band director, I believe that the warm-up is the most important part of the class. The daily warm-up is used to set the tone of rehearsal, reinforce pedagogical concepts, and to build technical skills. Daily warm-ups should be varied so that students do not get bored with the warm-up process, but warm-ups should also be consistent in order to establish a rehearsal routine. I believe that a consistent warm-up helps students to establish good fundamentals, enabling them to be successful musicians. Sufficient time in each rehearsal must be devoted to the warm-up process.
Building Blocks for a Better Band uses exercises to help develop the fundamentals illustrated below. I believe that students need to develop skills in the areas of Tone, Technique, Articulation, Intonation, and Rhythm/Sightreading in order to become good musicians. The exercises in this book are designed to help middle school band students develop their skills in these areas.
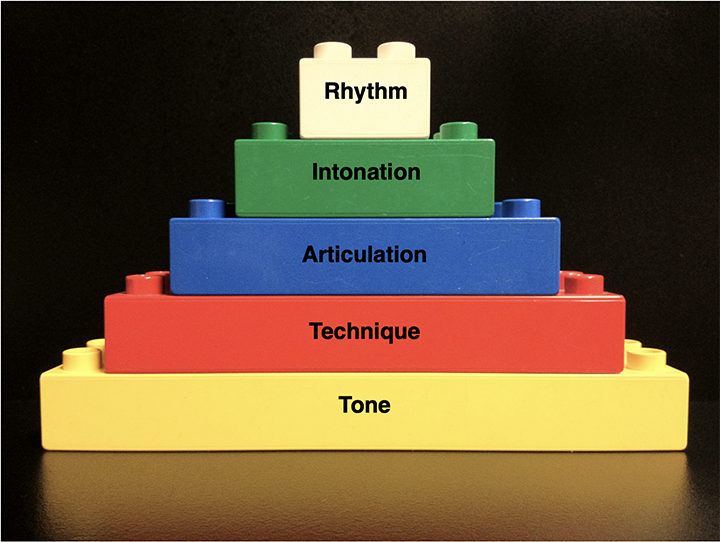
Tone is the foundation of the building blocks. Without good tone quality, all other musicianship skills are obsolete. No matter how well a student can play, if they don’t sound good while doing it, no one will want to listen!
Technique allows students to play faster and more difficult music. They need to be able to play fingering patterns in various keys at any tempo.
Articulation studies should be done daily. One of the biggest issues I have noticed in my bands is the lack of uniform articulation style. I have also noticed that it is much easier to teach legato/tenuto style rather than staccato. It is easy to teach students to play long notes the same. The difficulty with ensemble articulation lies in matching staccato styles and must be practiced. Students must hear the style they are required to play in their heads in order to reproduce it properly. This is accomplished through daily drill and practice.
Intonation skills must be taught once students begin to develop a characteristic tone quality. Students must be taught to listen to themselves, their section, and the band to make sure they are playing in tune all the time, not just playing one note in tune by themselves with a tuner.
Rhythm is one of the most difficult things to teach to students. I believe that in order to become an independent musicians, students must learn to count rhythms for themselves (this is especially useful when encountering new rhythms for the first time) and must learn how to hear or feel certain rhythms so they become second nature. I know that the older I get, the less I have to count rhythms on the page. Through daily exposure to varied rhythms, I have learned to feel the printed rhythm so that it is almost second nature to play it on my instrument. My goal for my students is that they will be able to do the same. This will help to improve their sightreading skills and will help them to become truly independent musicians.
How to Use the Warm-Ups
Building Blocks for a Better Band is organized by the 7 key areas of Concert Bb, Ab, F, Eb, G, G, and Db. These are the 7 scales required by the South Carolina Band Directors Association (SCBDA) for middle school students to audition for Region or All-State Band. The key areas are presented in that order, which is the order in which I teach my students. Bb and Ab are presented first because they have very few accidentals and are a comfortable range for both brass and woodwinds. F and Eb follow—key signature-wise they are still friendly but they are presented after Bb and Ab due to the range required of the brass students. To me, these first 4 are the most important keys because the majority of middle school band literature is written in one of these 4 keys. Concert C, G, and Db follow. I save Db for last because of the large number of flats for C instruments and because of the range of the second octave for the clarinets. Concert C and G are both taught towards the end because of the use of the alternating pinky keys in the clarinets (on B ad C#) and again because the second octave of the C scale is so high for the clarinets.
Each concert key area contains the following exercises, which were designed to help develop skills in each of the building blocks.
Tone
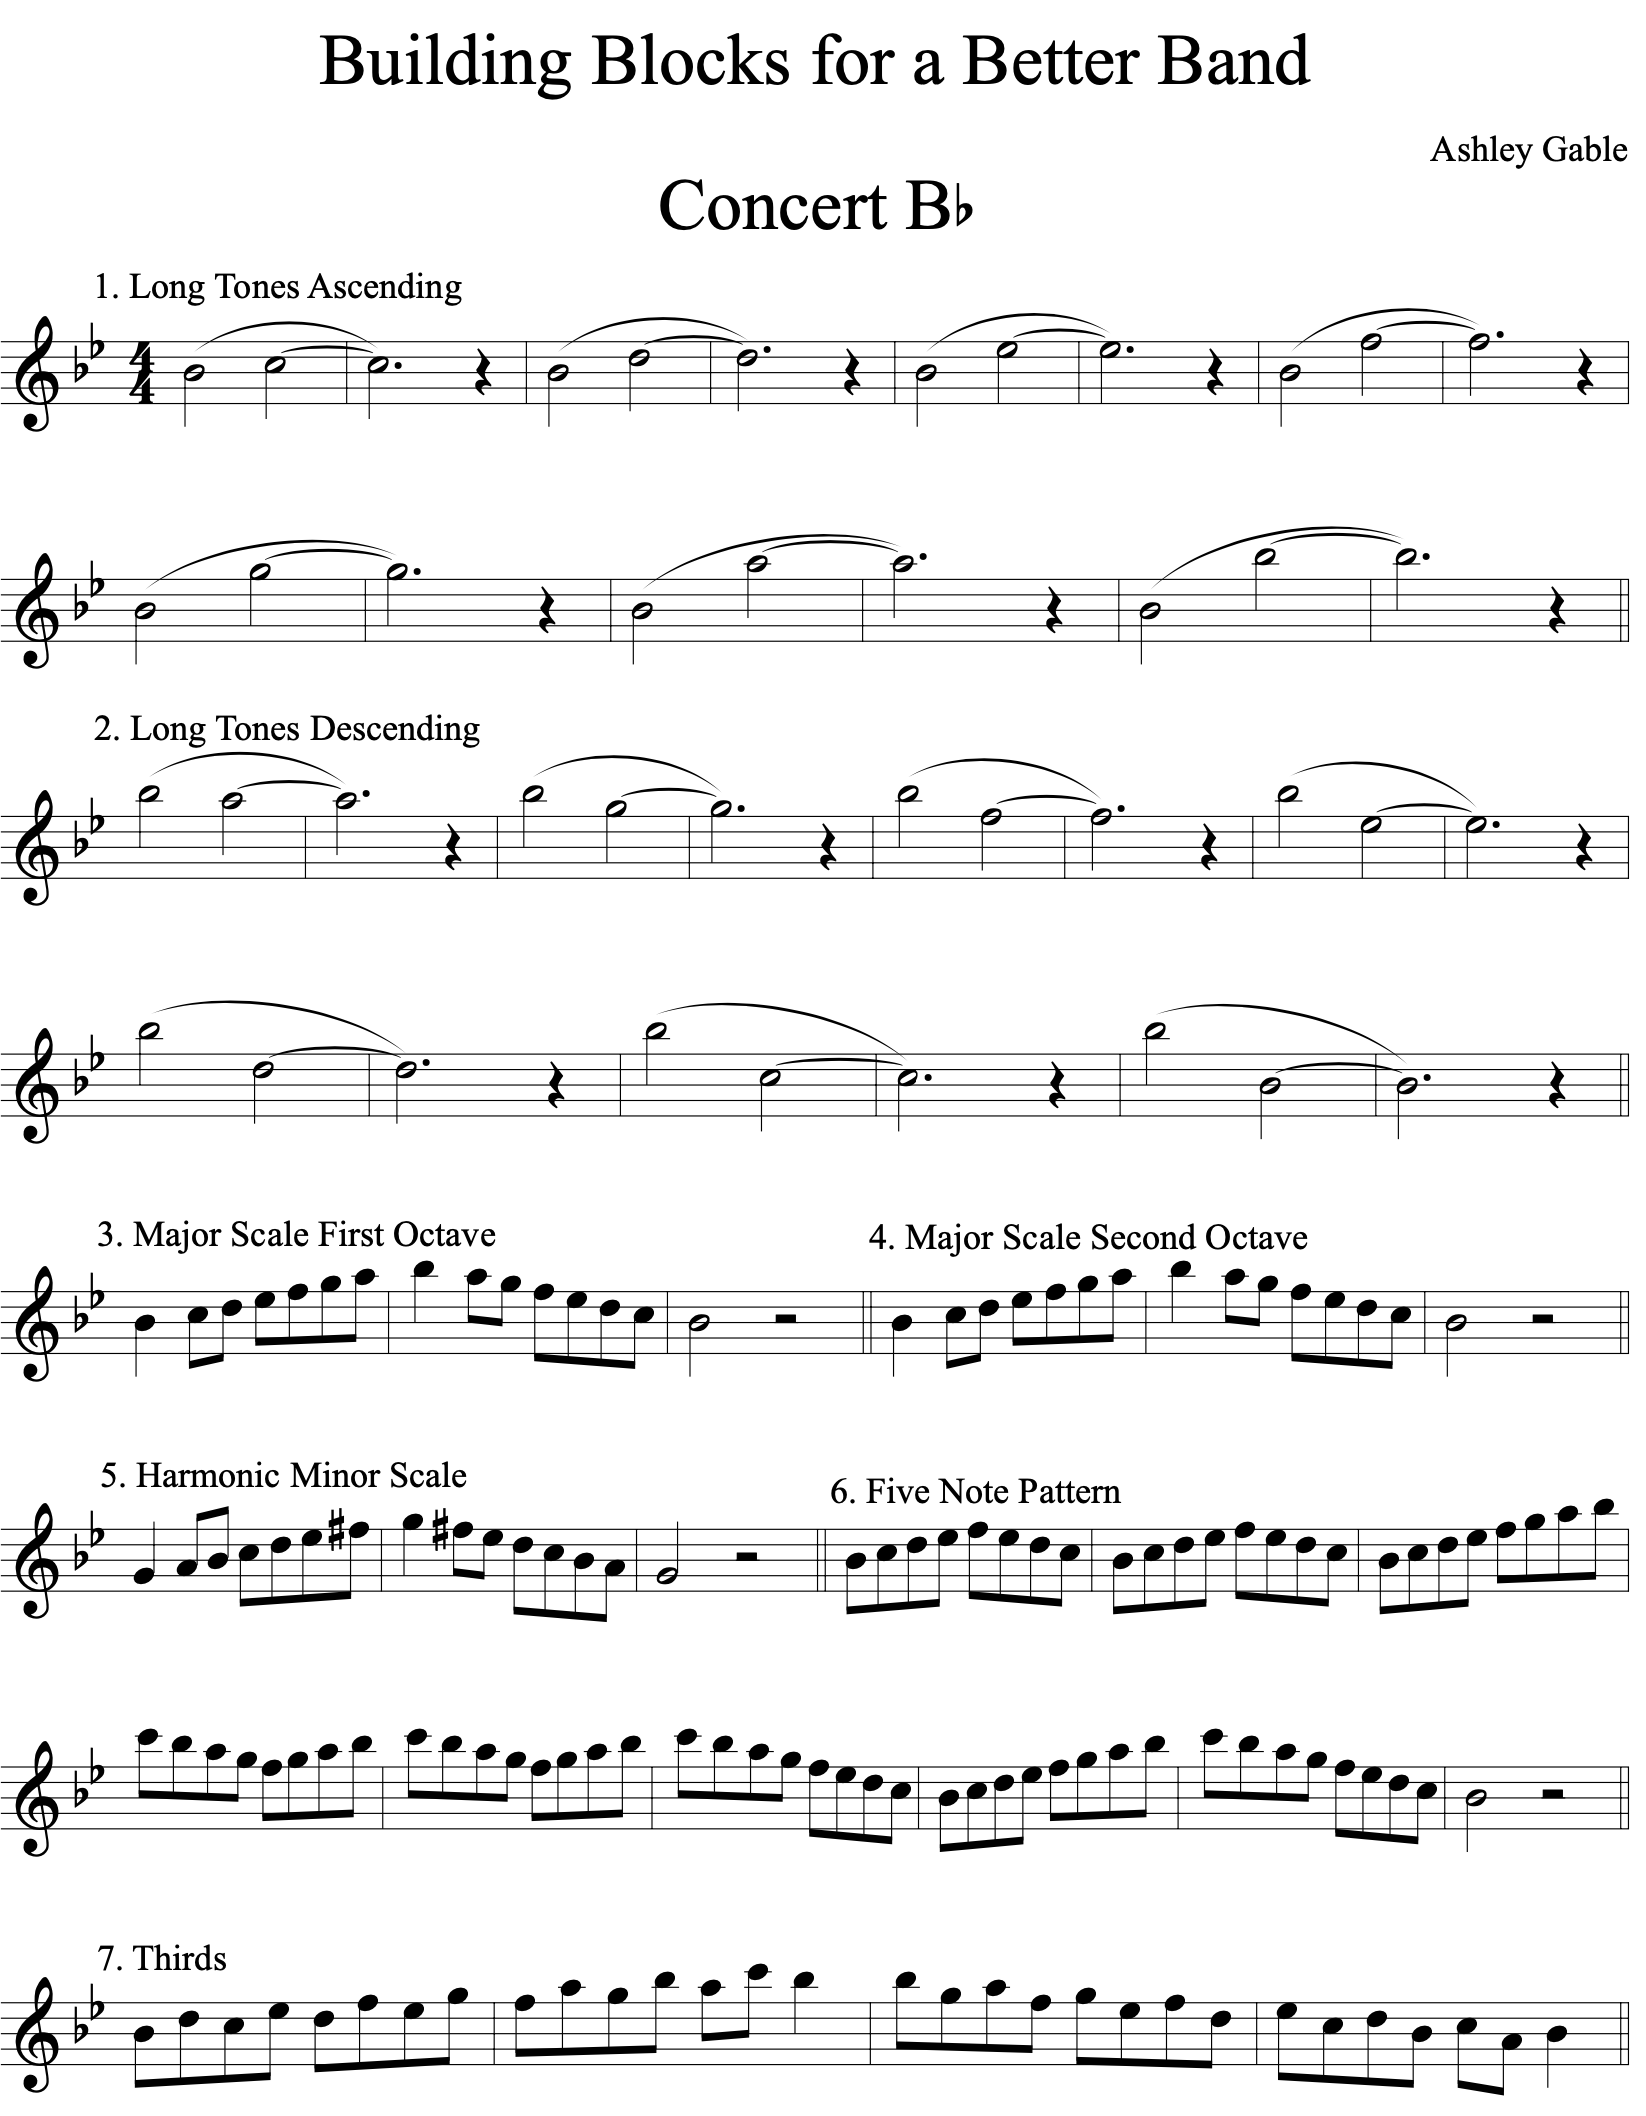
Exercises 1 and 2 are long tones built on the major scale. The ascending long tones always start on the tonic and progress through each scale degree, allowing students to listen and begin to tune the intervals. For a more varied warm-up, add a crescendo for every two measures. Students should start piano on the tonic note and crescendo to forte by the end of the scale pitch.
The descending long tones always start on the top note of the scale and progress downwards, again allowing students to listen and tune the descending intervals. Dynamics may be added to this exercise as well: have students start forte on the top note and decrescendo to piano at the end of the scale degree. These exercises should be played at a slow tempo.
Technique
Scales: The first and second octaves of the major scale as required by the SCBDA are presented in exercises 3 and 4. If students are not required to play the second octave of a particular scale, the first octave is repeated. Exercise 5 gives the harmonic minor scale associated with each key signature.
Exercises on the Scale: Exercises 6 and 7 present the major scale first in five note segments and then in thirds. These exercises present the scale in components commonly found in concert music and they also allow the students to become more comfortable with the key.
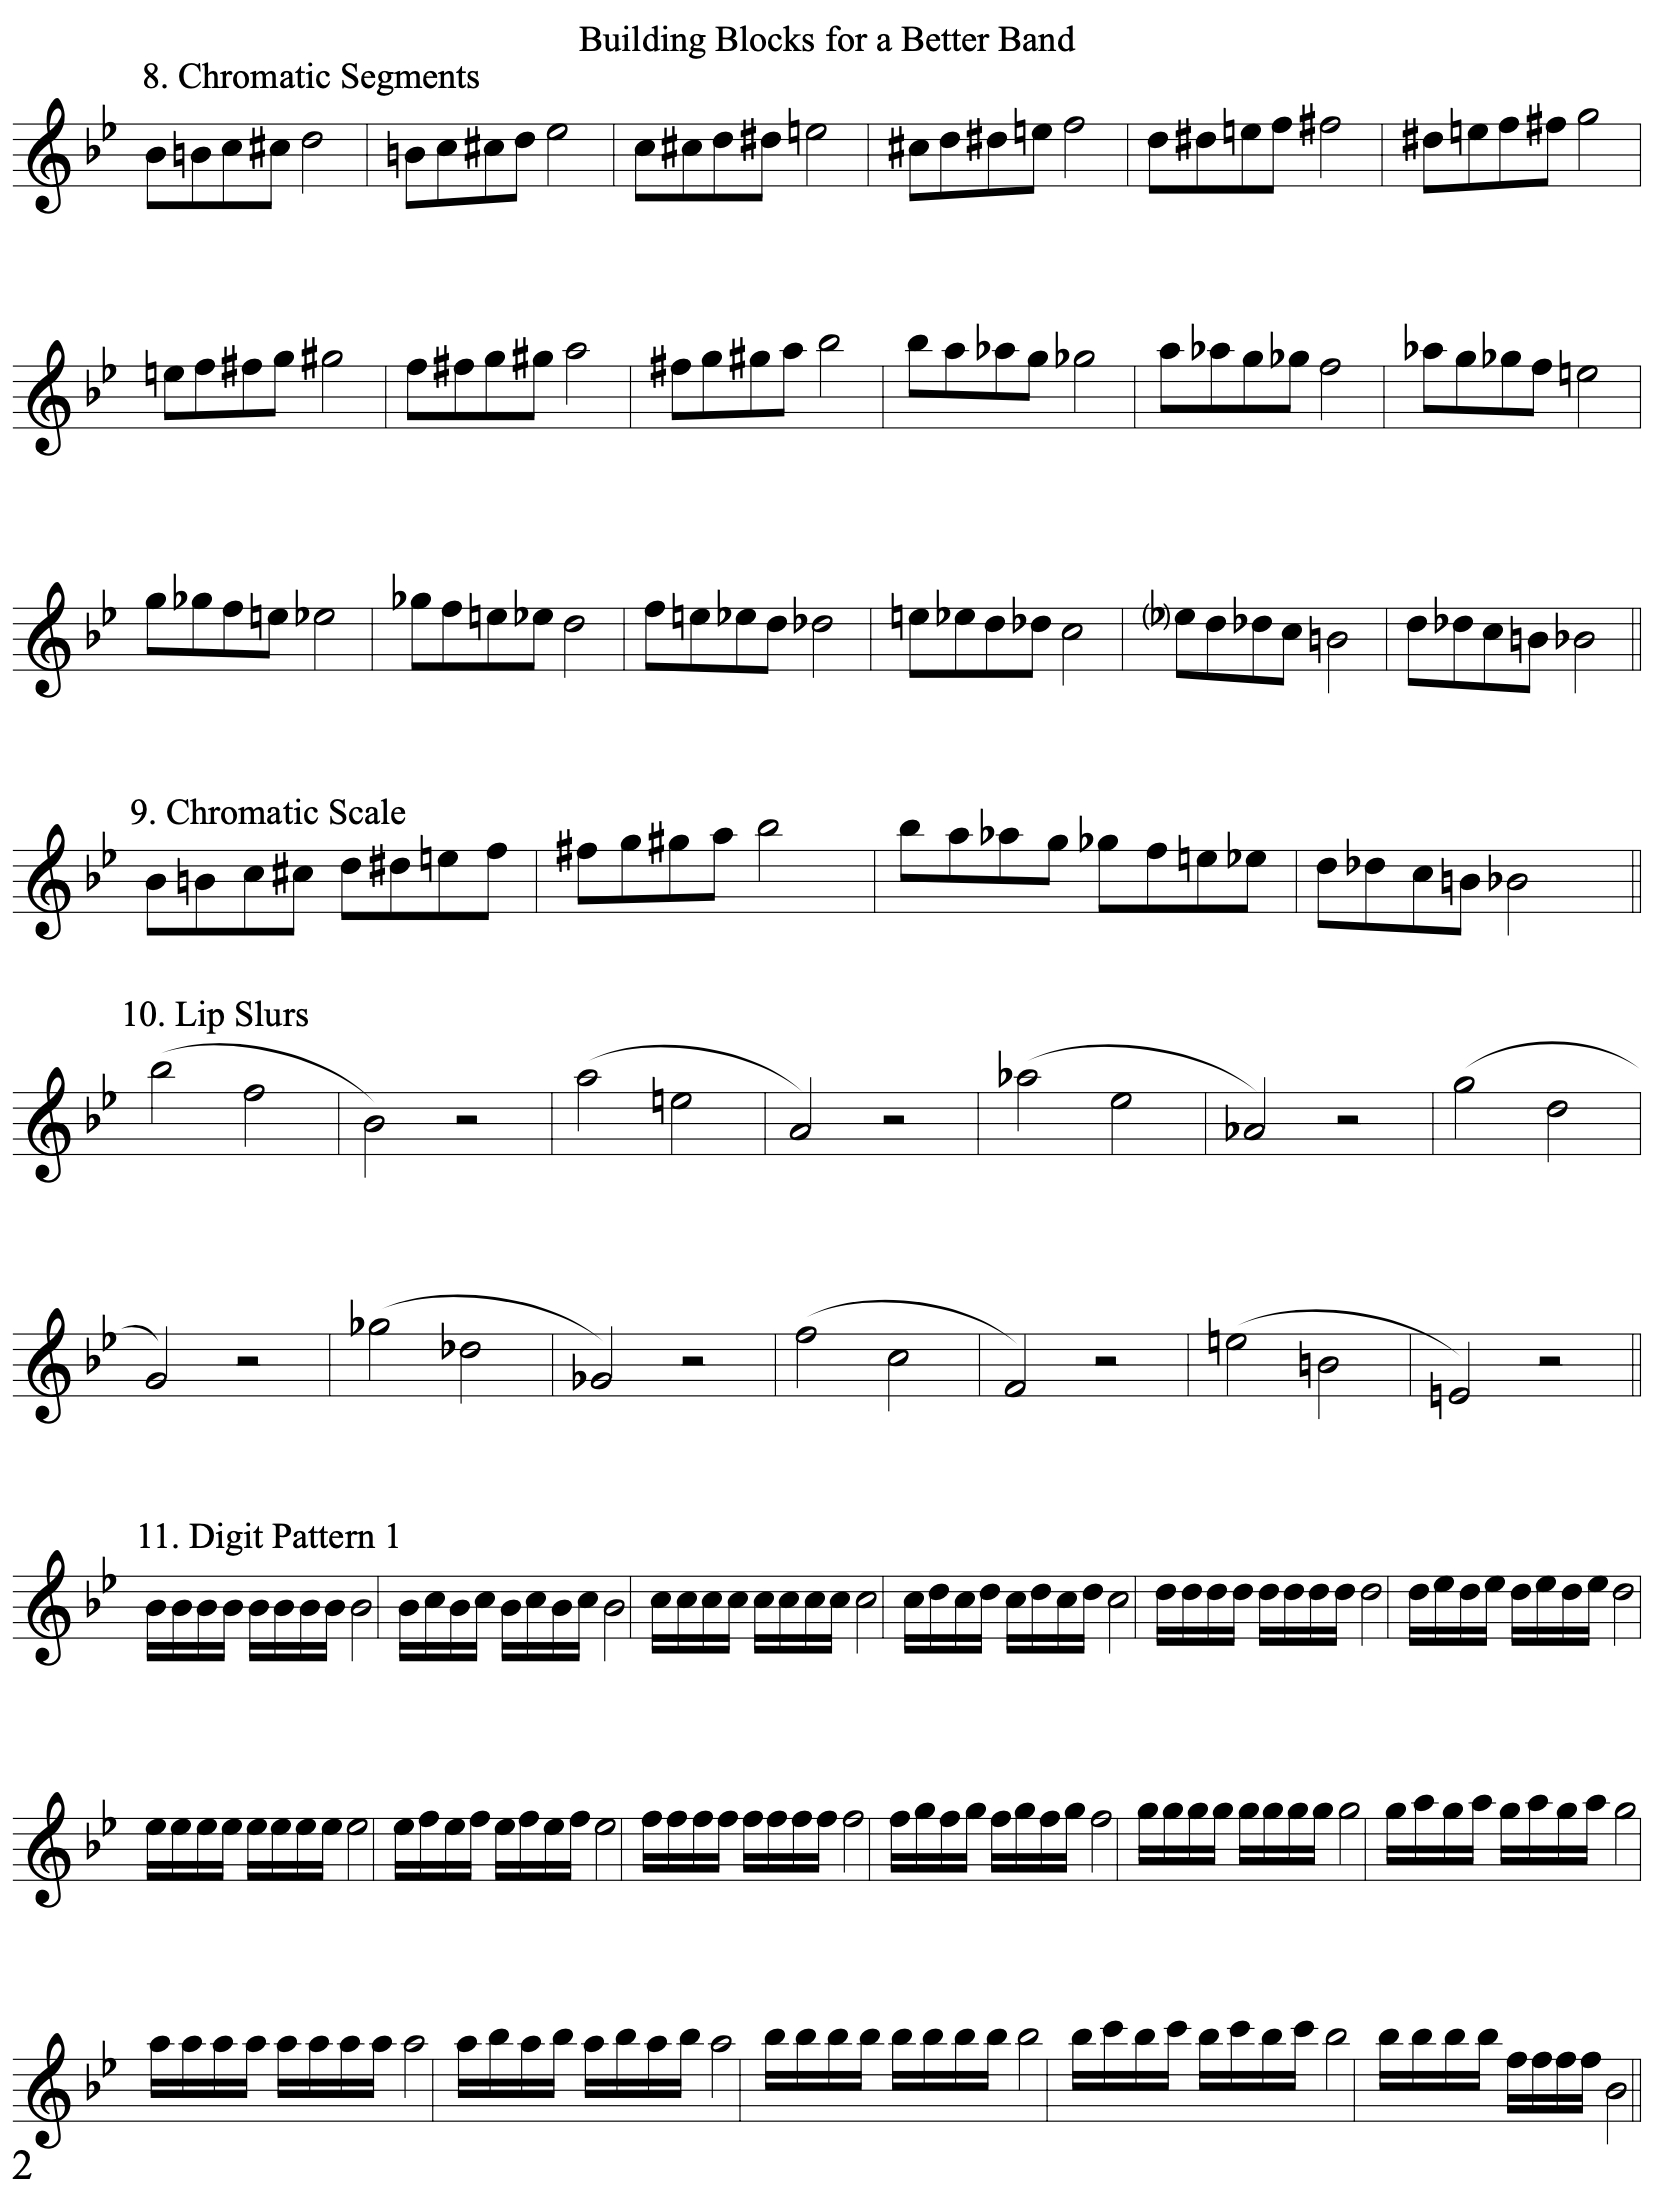
Chromatics: I have often found that my students are not as comfortable with chromatic scales and enharmonic pitches as I would like them to be. In exercises 8 and 9, the range of the major scale is used to build chromatic exercises—segments using 5 notes at a time and a “chromatic scale” starting on scale degree 1 and ending on scale degree 8 of the major scale. The repetitive nature of these exercises will hopefully allow students to become comfortable with reading and recognizing the enharmonic notes. I tried to only use sharps for the ascending portions of the chromatic scale and flats for the descending segments. I generally avoid using E#, Fb, and B#/Cb, as I have found these pitches are rarely used in middle school repertoire and have only caused confusion amongst my band students when seen in print.
Lip Slurs: For every key area, a separate lip slur exercise has been used. Each lip slur exercise always works through the same valve combinations for the brass (open, 2, 1, 12, 23, 13, 123) and is written in unison for the woodwinds, except for the clarinet. The clarinet plays the same notes but jumps through a different octave combination, allowing them to perform register key workouts with the band. I kept the other woodwinds in unison with the brass to again reinforce the recognition of different accidentals and to allow them to work on tuning the different intervals present. This way, as time passes and students work through each key area, they are presented with an advancing series of lips learn exercises to help develop flexibility in the brass and better flexibility in the woodwinds. The mallets are asked to play double stops in octaves for these exercises.
Articulation
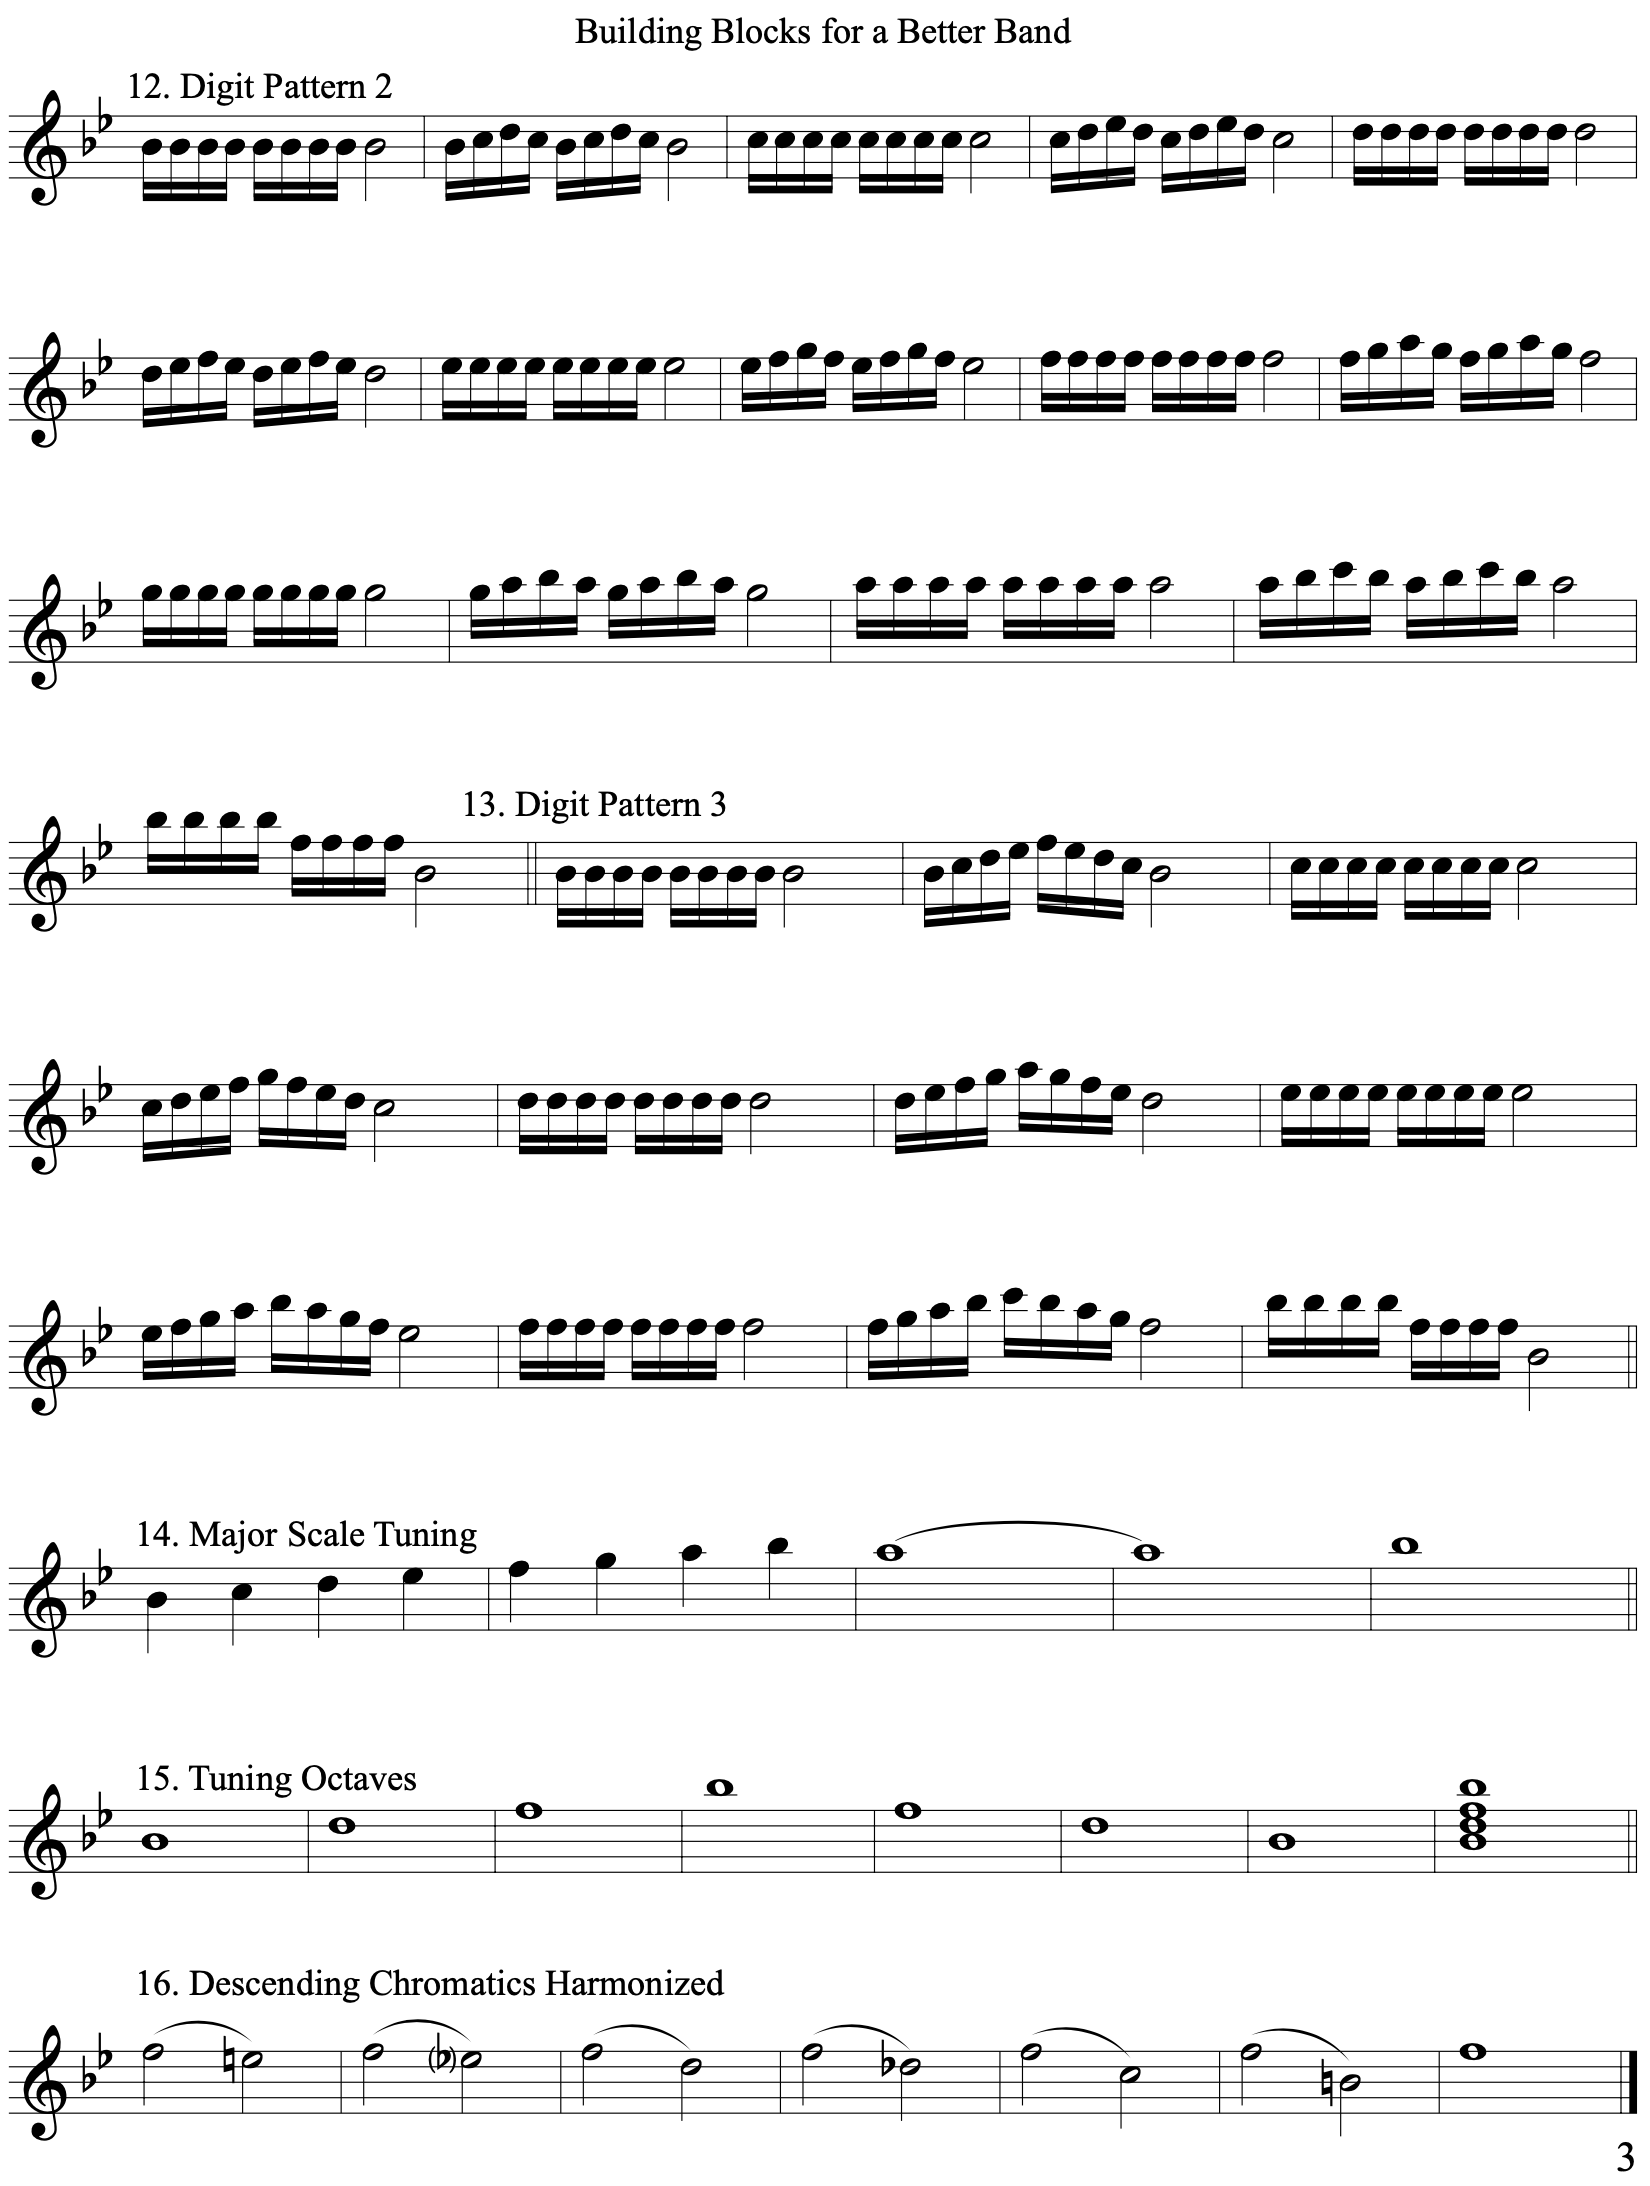
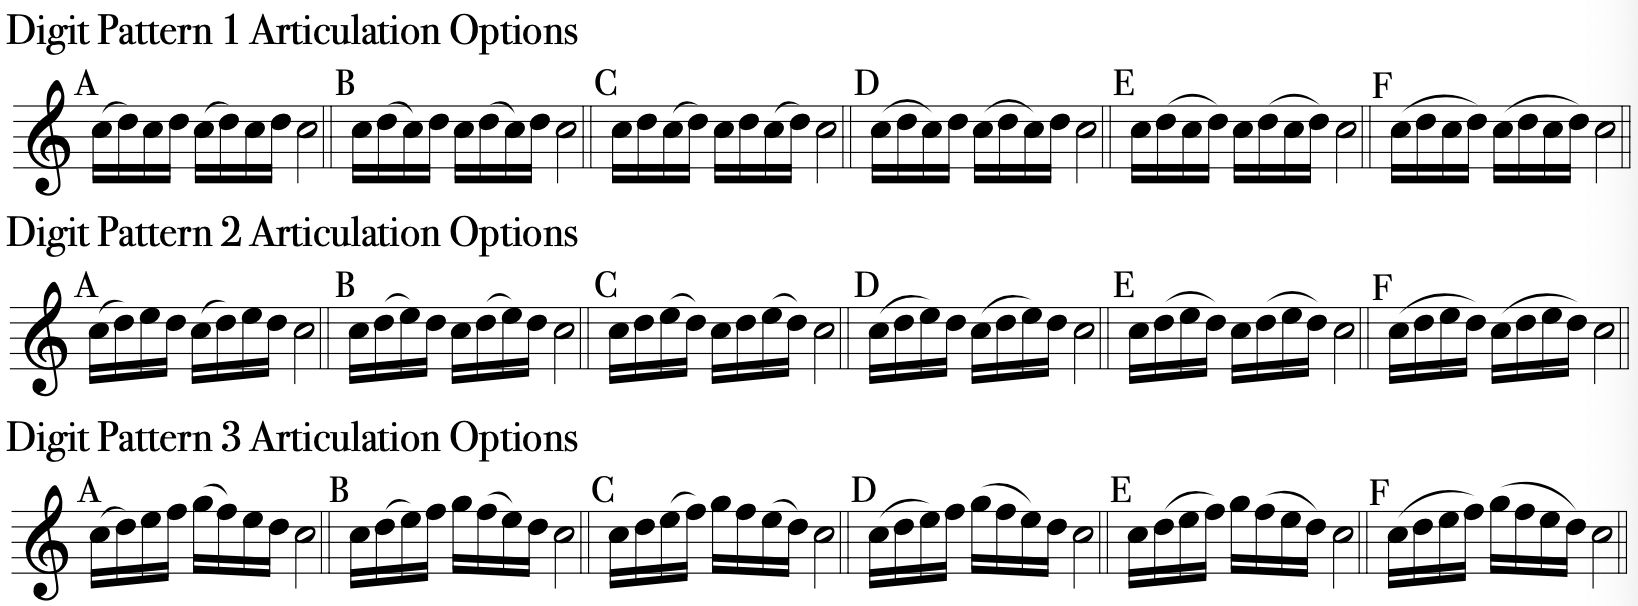
Exercises 11 through 13 are written specifically to develop articulation abilities with scaler passages. After students learn the digit pattern able to play them all tongued, you asked students to very their articulation using the different patterns listed below. I suggest posting the articulation on the board the first few times you ask students to play a certain pattern. After they become comfortable associating a name with a printed articulation, you should just be able to call out the pattern (for example, saying, “Slur two, tongue two” for Articulation Option A). This will allow them to work on different finger/tongue combinations. The listed articulation options can only be played on the even measures when the pitches change since every odd measure is just a strain repeated sixteenths on one pitch. Feel free to introduce your own tonguing patterns on these exercises or use the different tonguing options in conjunction with the Five Note Pattern or Chromatic Segments presented earlier.
Intonation
The final three exercises in each key area are presented as exercises specifically for working on tuning and should be played at a slow tempo, although any exercise in this book can be used to focus on intonation as they are all written in unison for the band. Exercise 14, Major Scale Tuning, presents the scale in unison as the band ascends. Descending, students stop on a different pitch of the scale in order to build a sustained V7 chord, which resolves to I. Students should listen for good unison intonation on the ascending portion of the scale and should listen for chordal tuning on the V7 and I chords. Use these chords to discuss the specific functions of fa-mi and ti-do in a V7 setting so students can better tune these intervals.
In exercise 15, Tuning Octaves, the major scale arpeggio is presented in unison for the students to work on octave tuning throughout the band. The final measure presents all notes of the I chord so you can divide students as desired for chordal tuning.
Exercise 16, descending chromatics harmonized, is the final intonation exercise. It presents descending chromatics from a starting pitch in the I chord, stacked in thirds through the band. This exercise again reinforces chromatic concepts and also allows students to work on listening for the tuning of changing intervals in the band.
Rhythm
The final pages of the Conductor’s Score and each part book are a collection of progressively harder rhythm exercises. These are designed to be used with even the youngest of students. The following is a list of suggestions for how to use the rhythm pages:
- Use a single measure from the rhythm pages and have students repeat that measure on each degree of a major or minor scale.
- Start on a specific measure and have students change scale degrees for each measure they play. For example, if they started on measure 10, they would play scale degree 1 for measure 10, 2 for measure 11, 3 for measure 12, etc. until they finished the scale.
- Have students clap and count out loud or tizzle and finger along through a specific set of rhythm measures.
- Divide the band in half (or by woodwinds and brass/percussion). Have half the band play a specific set of measures while the other half tizzles and fingers along or claps and counts aloud.
- Start on measure 1 and play through all the rhythm lines on one pitch. Have students stop playing as they make an error. The winner is the student that plays the longest without any mistakes.
- Have students start at the end of one line and play it backwards on one pitch. This will really get their brain cells working and challenge them to see the music in a new light!
- See what other ideas you can come up with on your own or have your students make suggestions for games to play using the rhythm pages.
Percussion
The percussion parts of this book are written for students to play either mallets or snare drum/practice pad. Depending on the number of percussionists you have, you can divide students in half, with half playing the drum part and the other half playing the mallet part, or you can have all percussionists play the drum part one day and the mallet part the next. I divide my students into two groups, A and B, and alternate A and B days. A days mean that students in group A play snare/pad and students in group B play mallets. B days mean that students in group B play snare/pad and students in group A play mallets. This method ensures that all percussionists are playing both instruments on a regular basis.
The mallet parts are written to be played in unison with the wind parts. For the most part, sustained notes are written as rolls in the mallet part. On the lip slur exercises, the parts are written in constant eighth notes in octaves for the right and left hand to help students work on spatial awareness and coordination when playing large intervals.
The snare parts are written with a corresponding rudiment for each of the 7 key areas used. The 7 rudiments used are the rudiments required by the SCBDA for middle school students to audition for the Region and All-State Bands. The rudiments correspond to the key areas as follows:
- Concert Bb – Paradiddle
- Concert Ab – Flam
- Concert F – Flam Tap
- Concert Eb – Five-Stroke Roll
- Concert C – Nine-Stroke Roll
- Concert G – Flam Accent
- Concert Db – Lesson 25
The snare drum exercises are written to develop basic sticking technique and hand coordination and to also introduce the rudiment in a sequential manner. The rudiments are broken down into their basic elements before being presented with their original notation (for example, flam taps are presented first as quarter notes, with a flam on the first quarter note and a repeated stroke on the second quarter note before being played as eighth notes.) On the lips learn exercises, snares play “Eights” in order to develop consistency with the stick height and technique. Students are asked to play mallets on the chromatic exercises to reinforce note reading and, on the tuning exercises, to aid the band in listening.
Download a full score and parts for all 7 keys
This is a complete set of parts for all instruments (300+ PDF pages)

