6. TEACHING CORRECT FINGERINGS
In my work with private students and band students over the years, there are several fingerings that are frequently fingered incorrectly. Most common is second octave D and Eb—the left first finger should be up. It helps to think of the left first finger as an octave key, according to Patricia George. The sound is different…really.
Fingerings for 3rd-octave notes can also be problematic, since many students discover that they can overblow the lower octave fingering to play a 3rd-octave note. The overblown version of the note will suffer in both tone quality and intonation and should be corrected. Correct fingerings for the 3rd octave are produced by venting at least one tone hole from the 2nd-octave fingering. Learning the similarities and differences of the two fingerings will help students remember the fingerings. Band directors should periodically check to make sure the correct fingerings are being used: D3 (right-hand fingers should be lifted), Eb3 (all fingers should be down, including both pinkies) , E3 (3rd left finger should be lifted) & F3 (2nd left finger should be lifted).
It is also important for students to learn the correct fingerings for trills in their music. Some fingerings are intuitive, but many are not. Easy-to-read fingering charts are available free online at http://www.gemeinhardt.com/res/fingering_diagram.pdf. They can be printed and distributed to the flute section. You can also get a trill fingering chart from Andrew Magaña’s Bandworld Magazine flute article.
7. PLAYING DYNAMICS
When flutes try to play softer by blowing less, their pitch becomes flat. In order to change dynamics without affecting intonation, students need to change the angle of their airstream while continuing to blow with consistently strong and fast air. For soft dynamics, the lower lip should be forward, even with the upper lip, so that the air stream is blown across the tone hole. This causes less of the air to go into the tone hole, resulting in the softer sound. Since the air stream used is the same speed as for other dynamics, pitch will not be affected. To start a note softly, use the syllable “pooh” with a strong air stream. An easy way for students to remember to do that is to tell them that “p” (as in piano) is for “pooh”. Conversely, for loud dynamics, the lower lip should be back, so that more of the air is directed down into the tone hole.
For crescendos, the student starts with a “pooh” attack (with lower lip forward) and gradually pulls the lower lip farther back to lower the angle of air, while maintaining the same speed air stream. For diminuendos, the lower lip starts back (so that the air is directed more of downward angle) and gradually is pushed forward to raise the air stream angle.
8. TUNING EFFECTIVELY
Tuning notes
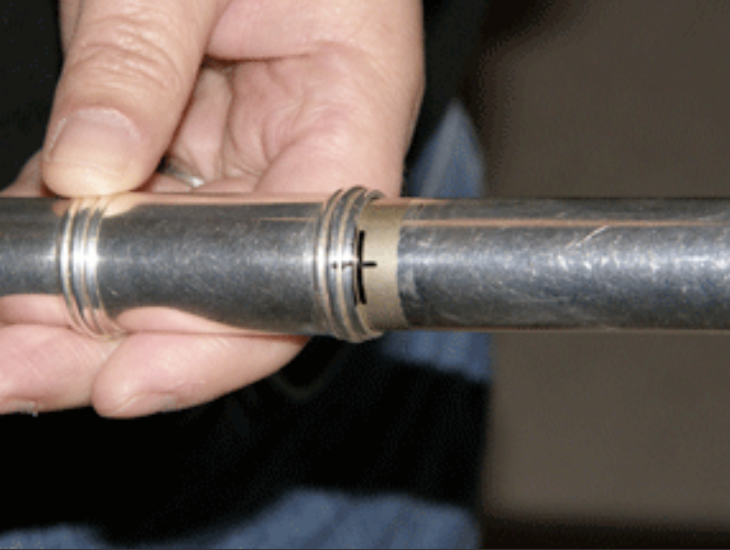
Before adjusting the head joint position, several different notes should be tuned. Since low notes tend to be flat and high notes sharp on many flutes, students should tune notes in different octaves to improve overall intonation, while using a strong airstream. Using an electronic tuner, I suggest tuning 2nd octave D, as well as low A and middle A. Because more fingers are down, D is a more stable note than Bb. When students play with a strong and consistent airstream, the overall intonation of most flutes is best with the head joint pulled out 1/4 inch. Many students do not pull out far enough, resulting in a very sharp high register. After the flute has been tuned, the head joint should be marked with a fine point permanent marker to aid in consistent setup. Matching marks can also be made on the head joint and receiver showing proper alignment of the center of the embouchure hole with the center of the first key. (See photo #6 below)

For best intonation, teachers should stress the importance of pulling out and aligning the head joint consistently, even when practicing or playing alone.
Checking head cork position
At the beginning of the school year and on a periodic basis, it is beneficial to show students how to check their head cork position by inserting the flat end of the tuning/cleaning rod into the open of the head. There is a line inscribed approximately 17mm from the open end that should be aligned in the exact center of the embouchure hole. The scale of the flute will be affected if this line is not in the correct position, causing some of the notes to be out of tune. If the line is higher than the center, show students how to lower the cork by unscrewing the crown one or two turns and pushing on it until the cork moves and crown snaps back into place. If the line is lower than the center, students can push the cork to a slightly higher position with the flat end of the tuning rod in the open end of the head joint. Check the new position of the line on the road and repeat, if necessary. Sometimes the cork will refuse to move at all. It may have been sealed in place with wax, in which case consulting a flute repair technician will be necessary to move it. Also, if the cork moves too easily, it may have shrunk because of age and need to be replaced.
9. IMPROVING INTONATION ON INDIVIDUAL NOTES
After carefully tuning the instruments as in #8 above, students need to know that there are other methods of adjusting pitch besides pulling out or pushing in their head joint.
Airstream speed
Slower airspeed lowers pitch, while faster airspeed raises pitch. Students should learn to play with a strong and consistent airspeed and avoid their natural tendency to blow softer for low notes, which makes them flat and listless, and harder for high notes, making them sharp and shrill. Teaching students to blow at a more consistent speed helps them play better in tune throughout the range of the flute.
Embouchure hole coverage
The lower lip should cover 1/4 to 1/3 of the embouchure hole to produce good tone. Covering too much of the tone hole will lower pitch, while covering too little will raise pitch. Students with flat muffled tone tend to cover too much of the tone hole, while students playing with sharp, bright, unfocused tone tend to cover too little of the tone hole. Students should learn to keep the keys of the flute parallel to the floor in order to develop consistency in the set up of the embouchure and coverage of the tone hole.
Airstream angle
Lowering the angle of the airstream will lower the pitch, while a higher airstream angle will raise it. Students should understand that the angle of the air stream affects intonation as well as the octave of the note played. The angle of the airstream is controlled by the lower lip: when the lower lip is pushed forward, the airstream angle is higher. In addition, the airstream angle and pitch can be flattened by slightly lowering the chin, and raised by lifting the chin slightly. These two methods are preferable to rolling the flute in or out to lower or raise pitch, as there is less impact on the tone quality.
Posture
Good posture is essential to good intonation. Bending or twisting at the waist can disrupt airflow causing notes to be flat. In addition, students should learn to keep the chin level with eyes looking directly forward, since dropping the chin will lower pitch. Students should understand how to determine the optimum height of their music stand for good posture. Students should also be encouraged to sit near the front of their chair to eliminate the temptation of draping their right arm around the chair back.
Playing with good intonation
Once the students have adjusted their head cork position and have learned to set up and align their headjoint consistently, there are two factors that will help students develop consistently good intonation: Keep the keys of the flute level (parallel to the floor), and always use a strong and fast airstream (birthday candle air).
10. USEFUL ALTERNATE FINGERINGS FOR THE HIGH REGISTER
There are several useful alternate fingerings for high register notes that will help bring the pitch down if these notes are sharp. These fingerings are easy to remember, since they are only slightly different than the primary fingerings.
E3: no right pinky
F3: add right ring finger
F#3: use middle right finger, instead of ring finger
Ab3: add right middle and ring fingers (this also helps reduce the note’s resistance, and should be used as the primary fingering for those students playing piccolo)


