

BASSOON ASSEMBLY
The bassoon is a fragile instrument. Made almost entirely of wood, a bassoon requires patience and care when putting it together AND returning it to its case. This will help ensure there is no accidental damage from forcing parts together, putting tension on the long key rods, bending the bocal, or chipping a good reed, etc.
Each part should fit together with only a medium amount of effort. Parts that fit too tightly may be damaged when forced by the student. It is important that you check all joints for a smooth fit before handing the student the instrument. Replacing a broken tenon joint is VERY expensive.
A bent vocal will need repair or replacement (replacement cost is about the same as repairing one for standard vocals – be sure to check this first).
STEP 1: Put the boot joint in your left hand, resting on your thigh or chair between your legs. With your right hand, insert the wing joint into the smaller hole of the boot joint. Line up the curve of the wing joint with the bass joint hole. As you insert the wing joint, be careful to apply pressure to the wood only – do not squeeze the keys or rods.
STEP 2: While holding the boot with your right hand, insert the bass (long) joint into the boot. Rotate back and forth as you push to make it go in easier. Remember to line up the thumb keys and attach the locking pin at the top of the wing joint.
STEP 3: With your right hand, pick up the bell and depress the Bb key with your thumb. Carefully push the bell onto the bass joint. Use a rotating motion as you push to make it go easier. Remember to align the connecting keys for the Bb to work properly.
STEP 4: Insert the bocal into place by GENTLY pushing and rotating it back and forth until the vent hole and whisper-key pad line up. Lastly, attach the reed to the bocal, adjusting it to be parallel with the floor when seated in the playing position.
POSTURE AND HAND POSITION
Seat Strap vs. Neck Strap
Establishing a relaxed and comfortable posture is an important step towards mastering the bassoon. A majority of professional players/teachers recommend the use of the seat strap instead of the neck strap for young players. When used correctly, the seat strap will support the instrument allowing for a more relaxed body, arm and hand posture.
Position the seat strap to allow the reed to touch just below the lips when pulled toward the face. The student can adjust the strap as needed by pulling on the strap on the left side of the chair. Always remember to keep the right hand on the bassoon while adjusting to prevent it falling to the floor.

Left-hand Position
• The left-hand covers the upper set of tone holes and keys. Using the fingering chart diagram as a guide, put your left thumb on the whisper key.
• Curve your hand and fingers around the instrument (like forming the letter “C”), reaching around to put the first finger over the “E” tone hole (the top one).
• Following the fingering diagram, position the remaining fingers over the correct tone holes and keys. Note: tone holes should be covered with the soft, fleshy pad of your fingers.
• Remember to keep your wrist straight and your fingers curved when supporting the instrument.
Right-Hand Position
• The right-hand covers the lower set of tone holes and keys. Again, using the fingering diagram as your guide, position your thumb over the large round key (E key). Note: Do not get in the habit of needing your thumb pressing a key all the time Depending on the notes, it may remain hanging free a lot of the time.
• Curve your hand and fingers around the instrument (form a backward “C”), reaching around to put the first finger over the B tone hole (the top one) and so on as the diagram illustrates.
• As with the left hand, curve your thumb and fingers in a relaxed manner and keep your wrist relaxed and straight.
BASSOON EMBOUCHURE
A correct bassoon embouchure is much softer than other wind instrument embouchures. A phrase often used to help describe it is “Slight Overbite.” The lower jaw must recede slightly to form the overbite. Follow these steps as described by Richard Polonchak in “Embou-Sure a step-by-step method” P. 23 & 24 – © 1987 W.I.B.C. Publishing:
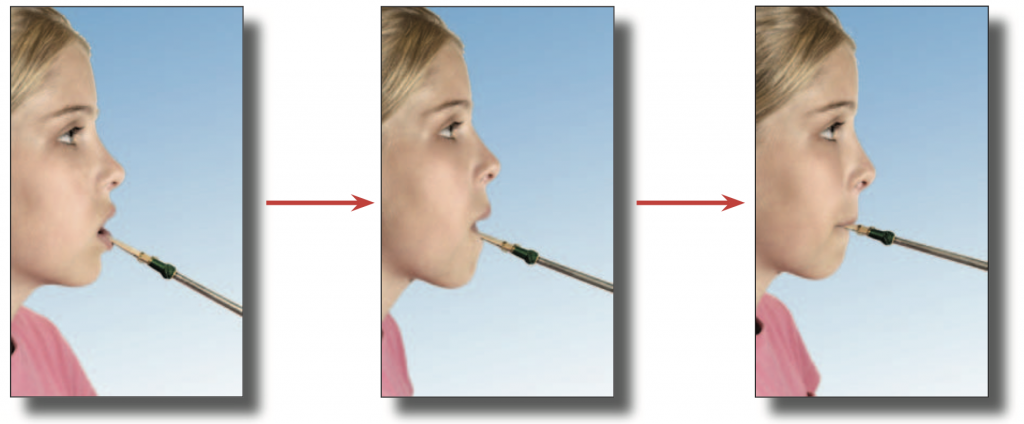
Step 1. Place the tip of the reed on the lower lip.
Step 2. Draw the reed into your mouth taking the lower lip with it. (reed should not slide on lip – lip will roll in, over teeth)
Step 3. Bring the top lip down slightly over the top teeth. When the reed is in your mouth, the top lip should be almost up to the first wire with the bottom lip slightly behind it.
Daryl Durran, Penn State University offers these ideas on bassoon embouchure:
• A correct bassoon embouchure is identical to the position of the lips and jaw when one says “ew” as in “dew.”
• The center of both lips is relaxed while the corners of the mouth are pursed, focusing toward the center of the mouth.
• The jaw is held open and the skin on the chin is drawn smooth – not pushed up with a frown.
Common to most bassoon embouchure descriptions are the following:
• Recede the lower jaw slightly to form a slight overbite.
• The upper lip should be closer to the first wire on the reed than the lower lip.
• The initial lip formation or “pucker” is similar to forming the lips to whistle.
• The teeth NEVER touch the reed.
• The lips support the reed all the way around not just top and bottom.
• There should be no air leaking around the lips.
• The relative firmness of the lips along with proper breath support control pitch and tuning.
• Bassoon embouchure is much softer or more relaxed than other wind instruments. Common embouchure issues and possible fixes:
• Student puffs cheeks – Fix: Using small water balloons, have the student practice blowing up balloons without puffing cheeks, keeping corners of mouth firm. Saying “weee” will allow the student to feel the firmness in the entire cheek.
• Student bites reed with teeth – Fix: Reset reed on the lower lip (Fig. 5.1) and follow steps 1-3 again. Teeth remain open while the firmness in the lips supports the reed.
• Not enough reed in the mouth – Fix: Review Fig. 5.3 on page 10. Have the student look in the mirror to approximate a similar reed position.
• Teeth touching reed – Fix: Reset reed on lower lip again, telling the student the lip cushions the reed as the teeth pull away – follow steps 1-3 again.
• Air leaks around the corner of the lips – Fix: The lips should feel as though they are supporting the reed in a circular shape – not just top and bottom. The student may be shaping embouchure into a smile – pull corners of the mouth down and in towards reed sides – increasing lip firmness in a circular shape.
With the proper embouchure, blowing the reed alone produces a sound called a “crow.” It can be described as a combination of a pitched buzz sometimes containing a shrilly rattle. The pitch of the crow is determined by the amount of reed in the mouth, firmness of the embouchure, and the amount of breath support.
A bassoon reed crow is not usually tuned but the relative pitch can rise and fall with changes in embouchure firmness and breath support. Ideal firmness will be determined when tuning notes played with the full bassoon and listening carefully to the tone quality produced.
TONGUE PLACEMENT & ARTICULATION
The process of articulation (tonguing the notes) happens entirely inside the mouth. Incorrect tongue placement will not be easy to diagnose and correct, therefore it should be discussed at the earliest stages of bassoon study.
There are only two questions to think about at the beginning stage of articulation development:
• What part of the tongue touches the reed?
• Where on the reed does the tongue touch?
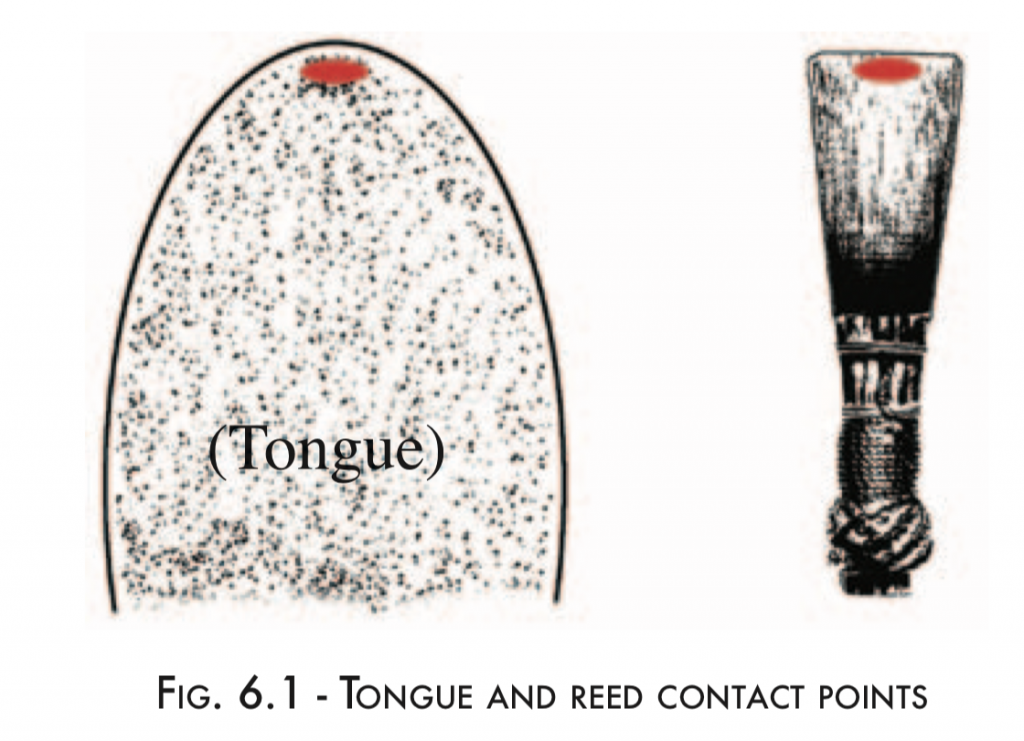
To answer the first question, we must first accept that among several bassoonists there will be slight variations in tongue placement. As a general rule, the tongue touches the reed using the spot indicated in the figure below. NOTE: The very tip of the tongue is not used as it would be too low and far forward to contact the reed in the proper place while maintaining a relaxed jaw, etc. For most players that spot is about 4 – 6 millimeters back from the very tip of the tongue.
The spot on the reed where the tongue will make contact is indicated by the dot in the diagram below… in the center of the reed, 1-3 millimeters past the edge of the opening under the BOTTOM BLADE of the reed.
William Diets, author of Teaching Woodwinds, P. 14-17, © 1998, offers the following points to consider when verifying proper tongue/reed contact and placement:
• Have the student describe the placement as if they were teaching it to another bassoonist.
• Ask the student to point out on both the tongue and reed the areas that make contact.
• Have the student put a dot on a diagram of a tongue and reed indicating where they believe they are currently touching when articulating notes.
• DO NOT use the very edge of the tongue (common among clarinet converts).
• DO NOT tongue into the opening or on the front edge of the reed (common among brass player converts).
• Be careful the tongue doesn’t touch the reed too far back on the tongue, i.e. a “Lah-lah” style of tonguing (common among saxophone converts).
Other common thoughts about bassoon tonguing and articulation to help illustrate for your students:
• Remember that the tonguing and articulation process happens inside the student’s mouth. All they will have to guide them is your descriptions of what it might look or feel like.
• They will be guessing at first… having an example CD or being able to demonstrate what the note should sound like will go a long way towards training the student to play by “sound” rather than playing by “feel.”
• Have the student look in a mirror to check for unwanted jaw, cheek, or lip motion while tonguing. The jaw, as well as the embouchure, must remain firm and steady.
• Most of the energy used for tonguing should be going towards proper breath support. Stress the lightest, most efficient motion of the tip of the tongue which produces the desired articulation result. Anything more will be wasted effort.
• A loose or wiggly embouchure usually produces a very spread tone that is quite flat and/or unstable.
• A biting or squeezing embouchure produces a stuffy, sharp tone. A student with this issue will also tire quickly.
• Former brass players learning the bassoon have noted that a relaxed brass embouchure is somewhat similar to a good bassoon embouchure.
Listening to quality audio examples of the desired tone and articulation styles is the best way to build a solid, fundamental bassoon tone concept. CD’s included with the various method books are a terrific start (make sure the CD isn’t a “midi” example – some are computer generated sounds instead of actual players). Recordings offered by professional players would be the next step. Most are readily available online or through a larger book/music retailer.


