
BASSOON REED SELECTION
Providing your new bassoon student with the best possible reeds is almost as important as making sure you have ordered the buses for the upcoming band trip. You finally have a student or two willing to switch and give it a try – now say “thank you” by providing reeds that will help establish good response, articulation, and intonation from day one.
Custom hand made reeds are not necessary (or likely available in your community) at the beginning stages of bassoon playing. For beginners, focus on the readily available commercial reeds. These are the reeds your music store representative brings out to you every week.
The brands of bassoon reeds your local music store would carry might include Jones, Emerald, LaVoz, Renard (Fox), Selmer and Brilhart (Plastic – made by Selmer).

As you look for a good reed source for your school and students, consider the following:
• Check your local music store first. They will want to help you and should be willing to stock a specific brand if you are sending your students to them.
• Larger regional music stores. A larger store may have a broader selection. These stores may also offer a quantity discount.
• Mail order catalogs. Every band director in the U.S. receives six or more of these each year. These are large, national stores with large inventories and often big discounts.
• The Internet. Some of the best bassoon reeds are available only via the internet. Usually from smaller shops, most often owned/operated by professional bassoonists. The worldwide web allows these smaller bassoon retailers access to a national and even international market instantly. Try doing a GoogleTM search using the phrase: “Bassoon Reed.”
• Your Colleagues! A quick phone call to a band director colleague who has quality bassoon students may be all you need to do. Most will gladly share their reed sources and consider your call a compliment.
Always remember, buying your reeds in person is much better than ordering by mail, online, etc. It allows you to hand-select and visually inspect each reed. Online or mail order purchases are usually “take what you get.” Check with the retailer regarding their reed return policy before ordering.
The following photos illustrate some of the variables you may encounter when personally inspecting and selecting commercial bassoon reeds:

As you inspect reeds at the music store, it must be said that many reeds may fail one or more of the above visual tests and still play OK. With experience and feedback from your students, you will begin to understand the basic characteristics of a well made bassoon reed and be able to dramatically increase the quality of the reeds you provide to your students. A few seconds per reed at the store will be all that is needed to decide whether to keep or reject any reed.
If a reed passes your “tip check” inspection, here are a few more points to check:
• First and second wires. Make sure both exposed wires are properly positioned and fairly tight to the cane. Reject any reed with loose wires – your beginning students will not know how to fix this.
• Butt end of reed must be round. Inspect the roundness of the reed end. It should be close to perfectly circular. Any reed not circular should be rejected as it will not form an airtight seal against the bocal.
• Square tip with no cracks or chips. It is not always safe to assume that machine-made commercial reeds are cut square at the tip or are free from nicks, chips, or cracks. Holding the reed up to a light will clearly show any imperfections in the tip.
• General construction. The reed must look “well built.” The string should be tightly wrapped with both ends tied off cleanly. All of the string should be covered in glue to hold it in place. Check the edges of the reed as well. Any gaps on the sides will cause a very poor response.
• Reed strength or “hardness.” All commercial bassoon reeds are marked with a relative strength or hardness. These markings are approximations. As a general rule, purchase reeds labeled medium or medium-hard for your beginning students. Anything softer just doesn’t give the player enough resistance to produce a good sound in all registers with a variety of articulation styles. Reeds marked “hard” generally require more time adjusting than you might be willing to give.
• Plastic reeds. Don’t even think about it… Do you start an alto sax player on a plastic reed? Clarinet player? You wouldn’t even consider it. My experience with plastic reeds has been absolutely awful. The plastic reeds made today are too “free blowing,” usually play flat, do not flex with embouchure firmness changes, and cannot be adjusted with a reed knife or file. Plus… they are often double the price of a natural cane reed.
Square tip with no cracks or chips. It is not always safe to assume that machine-made commercial reeds are cut square at the tip or are free from nicks, chips, or cracks. Holding the reed up to a light will clearly show any imperfections in the tip.
• General construction. The reed must look “well built.” The string should be tightly wrapped with both ends tied off cleanly. All of the string should be covered in glue to hold it in place. Check the edges of the reed as well. Any gaps on the sides will cause a very poor response.
• Reed strength or “hardness.” All commercial bassoon reeds are marked with a relative strength or hardness. These markings are approximations. As a general rule, purchase reeds labeled medium or medium-hard for your beginning students. Anything softer just doesn’t give the player enough resistance to produce a good sound in all registers with a variety of articulation styles. Reeds marked “hard” generally require more time adjusting than you might be willing to give.
• Plastic reeds. Don’t even think about it… Do you start an alto sax player on a plastic reed? Clarinet player? You wouldn’t even consider it. My experience with plastic reeds has been absolutely awful. The plastic reeds made today are too “free blowing,” usually play flat, do not flex with embouchure firmness changes, and cannot be adjusted with a reed knife or file. Plus… they are often double the price of a natural cane reed.
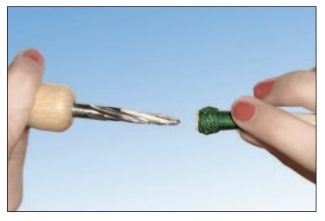
Ream every reed! What is reaming? Reaming is the term for scraping cane out of the inside of the reed, making the opening larger. It is important for the new reed to fit onto the bocal with a solid, airtight seal. The reed should slide onto the bocal about 1/2 inch. Reaming your new reeds should take you less than a minute for each reed. The key is a sharp reamer. You can purchase one at any bassoon reed supply shop. There are many brands and styles of reamers. Choose one with multiple blades that spiral from the tip to the handle. Expect to pay $80 or more for a good one. Twist the reamer as you apply pressure inside the reed. Check the fit on the bocal often. I ream reeds when dry – it seems to work fine and keeps the reamer from rusting.
REED ADJUSTMENTS
A thorough discussion of adjusting bassoon reeds is beyond the scope of this handbook. Some have described it as a “scientific process” taking years to master, others look at it as an “arts & crafts” project. My experience is that it is somewhere in between… leaning more towards the “scientific process” when I’m feeling like I just can’t get anything to work.
Your young bassoon students will want to play right away. They will accept the tone and articulation response of their very first reed. It is your responsibility to make sure that their first experience making a sound on the bassoon is positive and something on which to build. Rarely does a student even think about adjusting the reed for better response, tone, intonation, etc.
Most commercial reeds will make a basic sound on the bassoon. If you used the reed selection guidelines from chapter 7, chances are the reeds you selected will need only minor, adjustments at this level of playing. The rest of this chapter will highlight some easy to moderate adjustments that can improve all three areas of a new reed (tone, response, tuning). These adjustments are not the end-all for bassoon reeds, but only a summarization of the similar and/or consistent techniques offered by countless teachers and performers over the years. Use them as a starting point in your search for the “perfect reed” for your students.
Start by soaking the reed in water for 2-4 minutes. Check the tip opening after the reed is good and wet – this is the shape the reed will take when played. The following table is a collection of commonly accepted reed issues and their fixes. Use this table to help you put the finishing touches on your new reeds or your older reeds that need a “tune-up.”
- Tip opening too closed
Using needle-nosed pliers, squeeze the first wire on the sides (location 3). - Tip opening too open
Using needle-nosed pliers, squeeze the first wire on the top and bottom (location 1). - Weak low notes #1
Using needle-nosed pliers, squeeze the second wire on the sides (location 2). If the tip becomes too open, see weakness #2 above. - Weak low notes #2
Lightly remove (scrape) cane from the rear of the blades, testing often. - Reed too hard
Lightly remove cane from the center, rear of the blades. - Tone too bright
Lightly remove cane from the rail area, testing often - Generally hard attacks
Remove cane from the very tip. Avoid the center, testing often. - Plays flat, too easy to blow
Cut tiniest amount from tip, keep tip square, testing often. - Plays sharp
Lightly remove cane from shaded area. Test often, pitch will drop fast. Tone will brighten up fast. - Difficult to articulate clean, light staccato
Lightly remove cane from front corners. Test often, can become buzzy and bright very quickly.
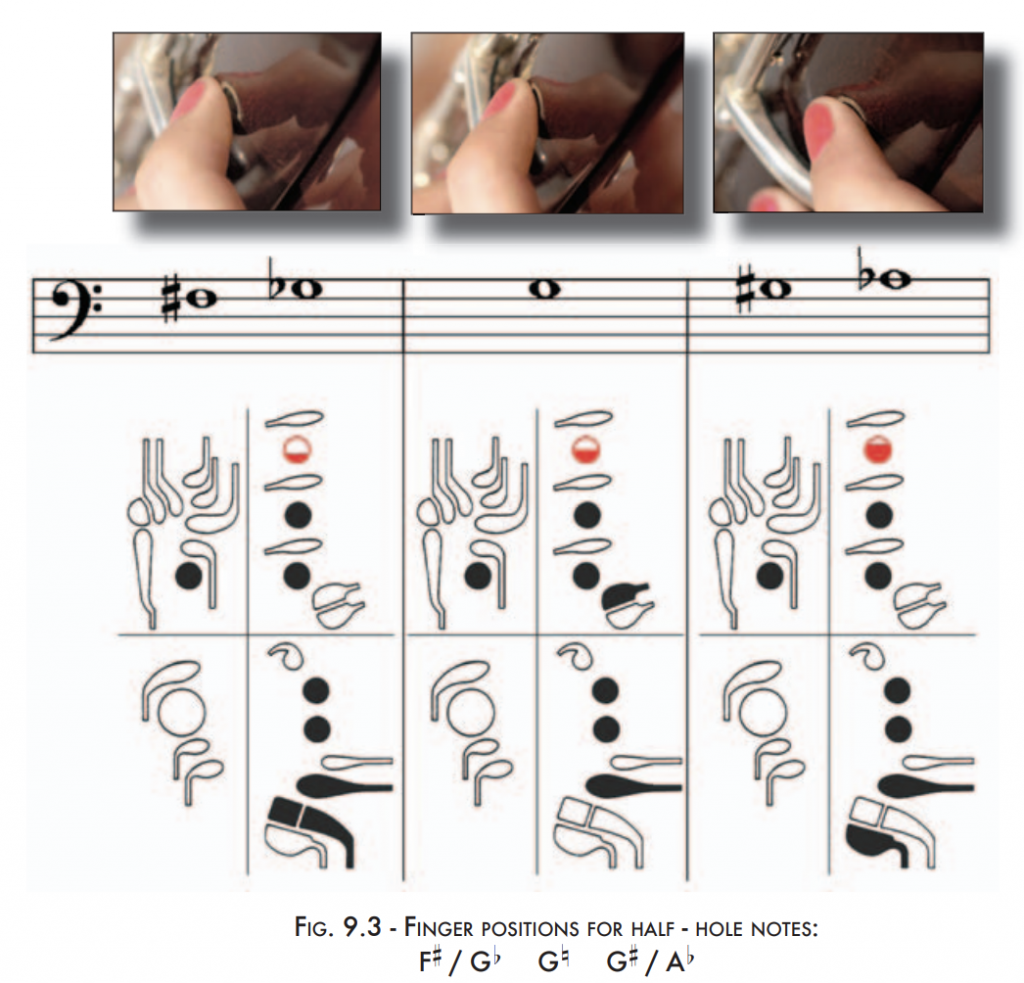
HALF – HOLE TECHNIQUE
Most beginning bassoon books, especially band method books, offer little if any explanation of the half-hole technique. There are only three notes that require it in the basic range of the bassoon.
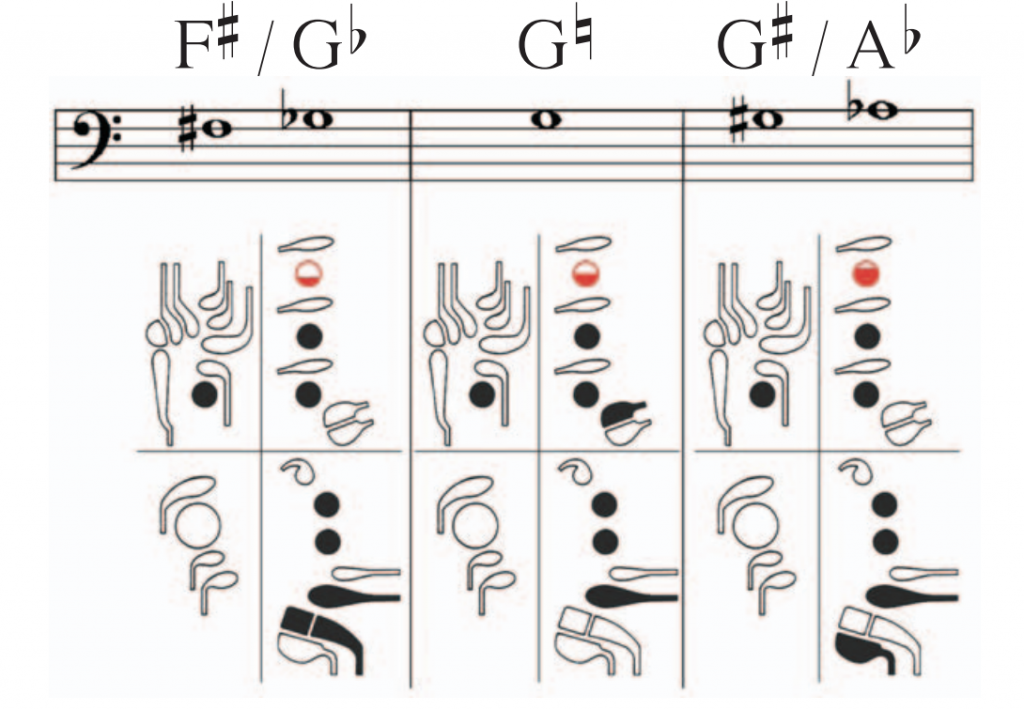
When playing these notes you must teach the student to rock their knuckle towards their second finger, rolling the soft pad of the fingertip to expose the tone hole. The finger should NEVER slide or lift-off of the instrument.
The term “half-hole” is technically misleading when referring to the amount of the open tone hole exposed when the finger is rolled. The note G should be learned as having a half-hole opening that is closest to actually half-open. The student will definitely notice a different level of response for the note G if the half-hole is too closed or open. Only careful practice will build a confident “feel” for where the G will speak the best.
If the opening for G is considered “normal”, the student should open slightly larger than normal for F#/Gb and slightly smaller for G#/Ab. Again, careful listening to the note’s response and consistency of attack will determine the actual size of the opening. With time and attention to detail this technique will become automatic.
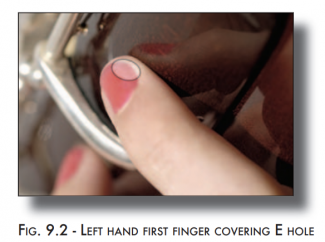
Fig. 9.2 below is an example of the first finger covering the E tone hole followed by the relative openings of all three half-hole notes. Reminder: these examples should serve as a starting point – use the sound of the tone, response, tuning, and quality of attack to determine the actual opening of the half-hole. It will vary slightly with different embouchure, bocal, reed and instrument combinations.
THE “FLICK” KEY NOTES
All too often, young bassoon students (and their band directors) overlook a necessary part of good bassoon performance… using the “flick” or “flicker” keys to slur properly from low or high register notes to the notes on the staff below. Most contemporary band method books and “complete” fingering charts omit the concept entirely.
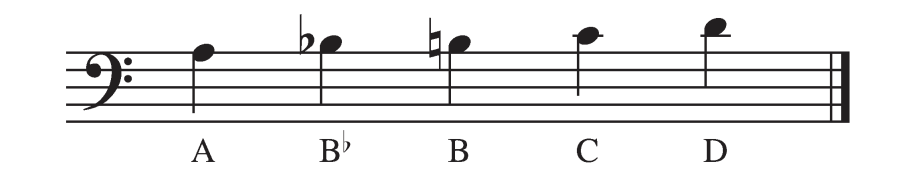
Omitting the flick keys when slurring to the notes above will result in a forced, uncontrolled, and often out of tune start to the sound. Compare this to a young flute player that forces the higher octave by just blowing harder without flexing the embouchure. In both situations, the result is an undesirable and out of tune sound. Proper flicking technique will allow the young bassoonist total control of the response and accuracy of the affected notes.
All of the flick keys are activated with the left-hand thumb. The appropriate flick key serves as a temporary octave key that is allowed to close before the note ends. Follow these summarized steps that Daryl Durran, Penn State University, describes to learning proper flick key technique:
- Play low “A” in a normal manner (whisper key closed).
- Continue playing low “A”, but lift the whisper key and position thumb above the
- “A” key.
- Lightly depress “A” flick key, holding key open as you increase airspeed and change voicing from “oe” to “ou” as you make the octave (or interval) leap.
- Release the “A” flick key when note is established, returning it over the whisper key.
The following diagram illustrates the flick keys and for which notes they are used:
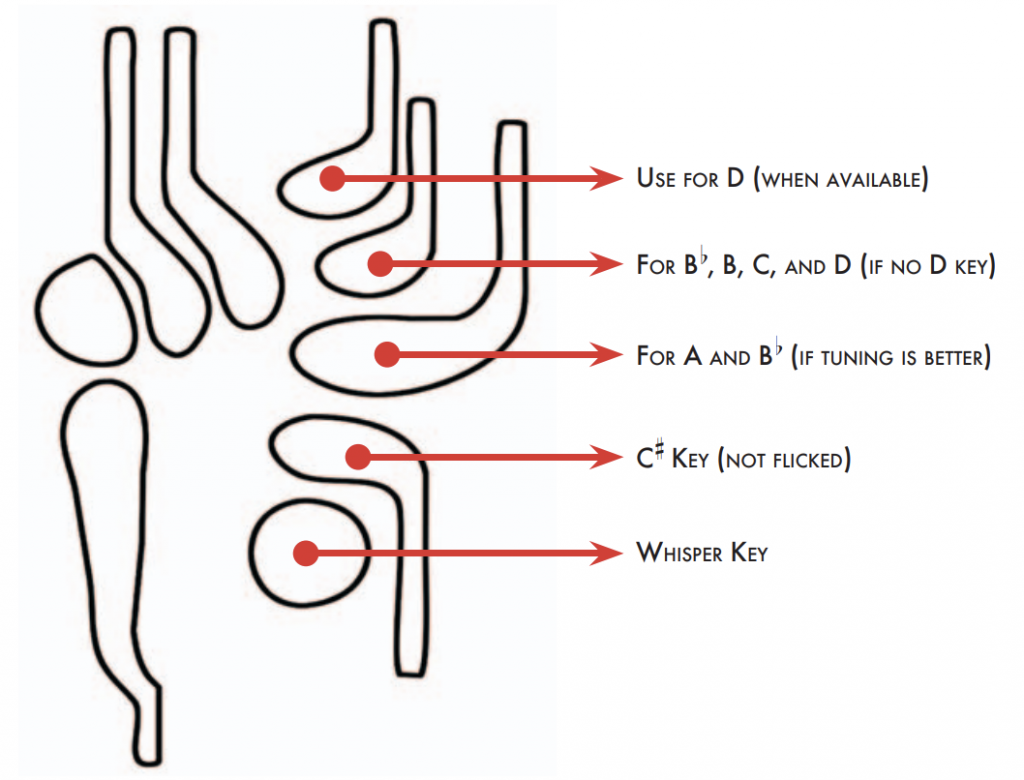
As with the other woodwind instruments, slurring up to a higher register note also requires a slight firming of the embouchure and slightly stronger air support at the instant you want the higher note to speak. It is best to let your ears be the judge regarding actual embouchure and breath changes as each note will vary slightly – and will vary even more as the student uses different reeds, etc. NOTE: C# does not use the flick technique as the C# key is often required to improve tone, intonation, and response.
Here is an example of exercises designed to help students incorporate “flicking” into their performance practice.
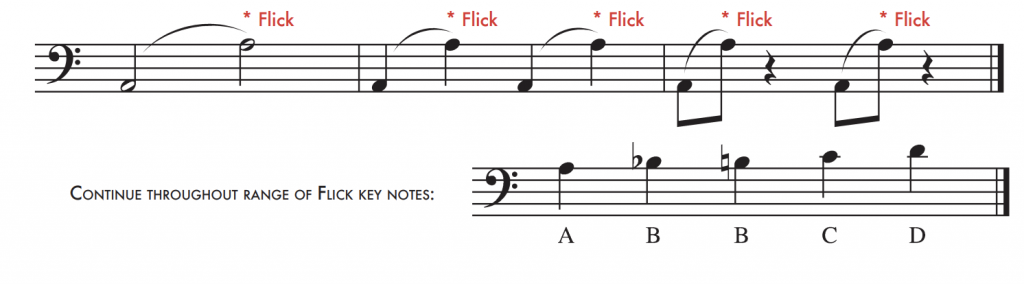
Teaching Woodwinds by William Dietz, p. 56-57, © 1998 Schirmer, provides several valuable exercises for further study of the flicking technique.
CARE AND MAINTENANCE
Caring for a bassoon is essential to keep the instrument in top playing condition. Problems sometimes start when the band director fails to teach the new bassoon student daily and periodic maintenance procedures. It is startling how many school-owned bassoons end up in need of major repair after only 6 – 9 months of use. By following these simple tips, your bassoons will maintain their best playing condition for every performance.
Daily care:
- Remove the bocal and blow out any moisture.
- Put the bell and bass joint in the case – they don’t get wet from breath moisture or saliva.
- Remove the tenor joint and swab it out 2 or 3 times.
- Dump any moisture out of the boot from the smaller bore hole – it is usually lined to resist moisture.
- Swab the boot joint with a bassoon only weighted pull-through swab. Insert the weight into the larger hole, rotate the boot so the weight comes out the smaller hole and pull through. Repeat 2 or 3 times. DO NOT insert the swab into the smaller hole first… you will be pulling all of the moisture into the unlined section of the bore.
- Provide a silver polishing cloth for daily wiping of the keys. A gentle rub should remove any fingerprints and keep the silver shiny.
- NEVER store paper/music/books inside the case. You will bend the keys and rods when you close the case
Monthly care:
- Clean out the whisper key tone hole opening. DO NOT use a paper clip – it is too easy to damage the opening size. Use a toothpick or stiff broom bristle to remove any debris that may build up or get lodged from the bocal brush.
- Clean out the bocal with a “bocal brush” and luke-warm soapy water. Be careful not to damage the reed end with the metal spring. Also polish bocal with a silver polish cloth to restore original shine.
- Using a small, clean, paintbrush, dust around and under the keys to remove any buildup on the wood or springs.
- Oil the posts and rods with a needle oiler. You can purchase a needle oiler at almost any quality double reed retailer.
- Clean the joint tenons: a. Cork tenons – clean by rubbing with a soft cloth to remove any old/excess cork grease. Check the receiving tubes as well. Apply new cork grease and rub it in by rotating the tenon in your hand until it warms up from the friction. This will allow the cork grease to penetrate more completely. Wipe off excess grease when done. b. String tenons – clean by rubbing with a soft cloth to remove any dirt/debris. Check the receiver tubes as well. Apply canners wax to the string tenons by rubbing with the grain of the wrapped string. Remove any excess and test fit for smoothness.
- Vacuum out the case using a soft end vacuum attachment. This eliminates the buildup of dust/dirt in the support areas that hold the instrument securely. If not cleaned, these particles can leave scratches and wear marks on the keys and finish of the wood.
Did you know… number of almost every bassoon is engraved or stamped on the metal U-joint assembly is hidden under the boot cap?
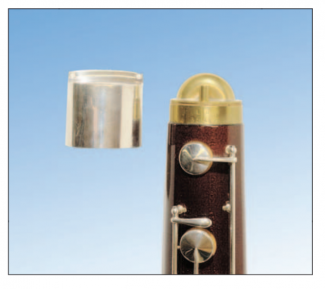
The boot cap is not made to be removed frequently, but it will come off. Be careful not to drop it or bend it in any way as it stays put via a friction fit only. Sometimes the serial number is also written on the wood tenons of each joint as well.


