
There are as many or more students that play the saxophone than play any of the other woodwind instruments. The success of jazz festivals, the prominence and leadership of fine soloists and the added strength to the marching band have made the saxophone attractive to many students. The teacher/director’s responsibility is to provide good guidance.
- Assembly
- Mouthpiece and ligature
- Choice of reeds
- Posture
- Breath support
- The embouchure
- Good tone
- Techniques
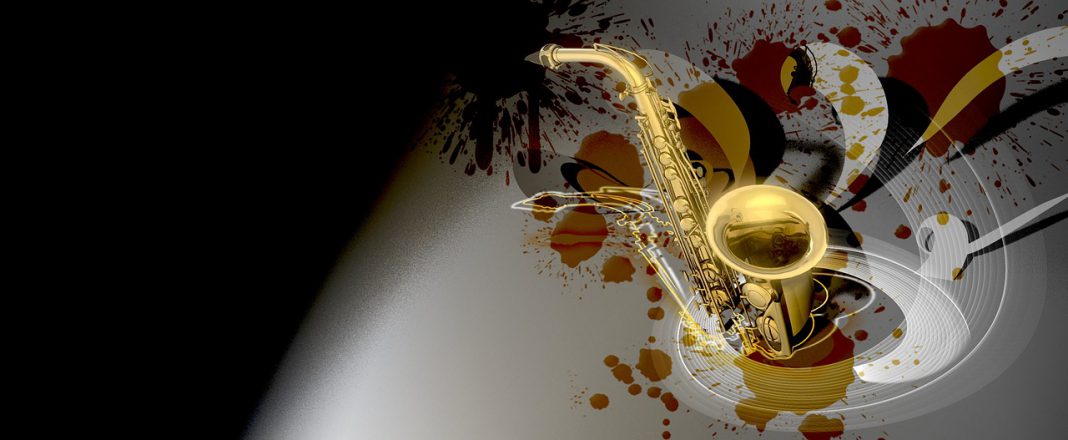
Remove the instrument from its case and hook it to the neck strap. A neck strap of webbing (about 3/4 inch) is best. It can be adjusted quickly and it will remain firm and strong. Insert the neckpiece and add the mouthpiece. Be sure the metal joint of the neckpiece and the receiving joint of the instrument are clean. Cork grease is used only on the cork. Tighten the neck screw only enough to keep the neck- piece lined up with the saxophone body. A continual forcing of this screw will “strip” threads. The neckpiece will swing freely from side-to-side and always bother the student. The mouthpiece must fit smoothly to the cork.
Any gap or play at point A will cause a leak in the tone (especially low notes). Yet, the mouthpiece must easily slip down the cork until intonation is OK. Use thin strips of paper to fill in any gap at point A.
Check the octave keys. Any leakage (poor adjustment) at these points will negate low notes and upper notes of the left hand. Quick repairs can be made by adding coats of Scotch Tape. Also check the G# key. This key may stick when the wet pad dries on the pad socket. Just press the G sharp key and “flick” the pad open. The free action of this key allows the pad to stick. This key sticks quite often, but there is nothing wrong with the instrument! These comments on assembly apply mainly to older instruments. Most newer instruments should be well adjusted and ready to play.
MOUTHPIECE AND LIGATURE
Directors know that there are many kinds of mouthpieces for all instruments. Saxophonists will use one style for their band and solo work. They will use another more powerful mouthpiece for their jazz work. A mouthpiece may be roughly placed in one of three styles.
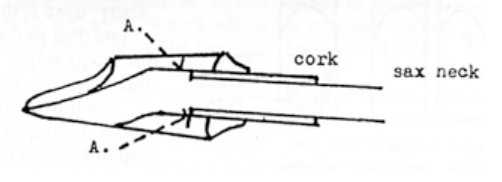
Look at the back bores. “A” (the circle) will give the most pleasant sound for serious playing. “B” is a compromise that will give a good tone with more brilliance. “C” will give the most power to the tone. Of course, there are many, many variations and ideas used with the clarinet and saxophone mouthpieces. Some players spend a lifetime looking for the best mouthpiece and reed.
The ligature must be loosened to allow the back end of the reed to be slipped under the ligature on the mouthpiece. The reed is then lined up to form a good match with the tip rail and the side rails. Tighten the ligature enough to hold reed in place. Vibrations will be stifled and bruise marks may bend the reed if screws are too tight. The teacher should fit the reed to the student’s mouthpiece.
Use a brand of reed that is consistently good. A good dealer and advanced students can give advice about reeds. Altitude and humidity are factors to be considered in reed selection. A soft reed can be used in dry Colorado. A stiffer reed must be used in the dampness of coastal areas. Look at the heel or butt-end of the reed.
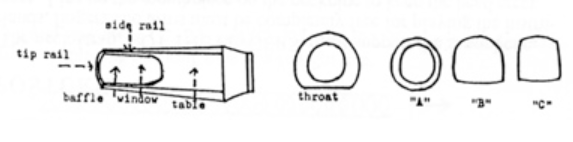
 Look at the face of the reed. Roll the tip of the reed on your thumbnail. 1/8″ is flexible and even. A few fibers will go to the tip of the reed and the face cut needs to be even. There will be a balance of light shading between the tip, side rails, vamp and heart of the reed.
A beginning student must have a good reed which has been selected by the teacher. The student will not know if the reed is soft, stiff, out of balance or just right. He will think his money will always buy a good new reed. Yet, there is no sure way to know that reeds are good.
Soak several reeds in water for 3 or 4 minutes. Fit the reed to the mouthpiece with a good fit to the tip rail. If the reed extends beyond the tip rail, the reed will be stiff. If the reed does not reach to the tip rail, the reed will also blow stiff. Vibrations of the reed must make a good seal to the side rails and to the tip rail.
The reed may curl or have wrinkles in it when it is re-moistened (a reed that is several days old). This is caused because material between fibers (grain) of the cane is softer than the grain or fibers of the reed. Plastic reeds may be purchased, but they do not have the rich tone and flexibility of reeds that are made from French cane.
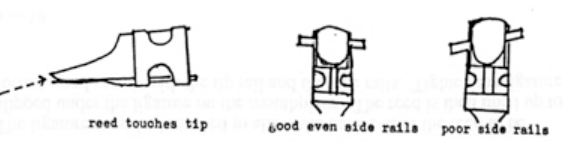
Slide a piece of paper between reed and side rails. This is an easy way to find poor mouthpieces.
Do not “push or force” mouthpieces on the neck cork. Go slow and use a circular motion. You will rip or tear the cork if you are in a hurry and you will ruin the alignment of the reed. THE REED, MOUTHPIECE AND NECKPIECE are the most important details to take care of.
POSTURE
The neck strap, NOT THE FINGERS, must support the saxophone. Hands, fingers and arms must be completely free for playing the instrument. Line up the mouthpiece on the neckpipe to keep the head erect. (Do not let students tilt their head toward the left shoulder). Align the mouthpiece to keep the head erect, even if the saxophone seems to be to the right side of the student’s body.
“Sit tall or stand tall!!!” Wind students must apply good athletic principles to their practice and performance: full use of lungs in breathing, a most efficient use of muscle without becoming tense, excellent eye coordination and a mind coordination that plan ahead, plus a repetition of practice that builds success in each activity.
BREATH SUPPORT
Most teachers have their own method of teaching breath support. Each of the Embou- Sure Series (tuba, clarinet, flute, trumpet,etc.) offers suggestions for breath support or good breathing habits. Good posture, slow deep breathing and an open throat should always be mentioned as the group begins daily practice. (From “day one” of my career beginning in 1936, I never gave a down beat unless all band members were in good position.)
- Do not raise shoulders. Many young students will raise shoulders when told to take in as much air as possible.
- Use damp air. Demonstrate how to say, “Haw” with damp air to clean glasses.
- This is a good trick to teach breathing: Place elbows on knees and touch finger tips to center of forehead above nose. Do not let shoulders move and breath slowly. Feel the low expansion at the belt-line, front, side, and back.
- Mention deep breathing quite often. Tight nerves will often result from a quick breath that “fills only the upper half of the lungs.”
- Breathe with teeth resting on top of mouthpiece. Many young people rest the reed on lower lip and breath by tilting head backward. This causes a movement for each breath. The mouthpiece is never under the control of a sure embouchure.
- Put a small piece of plastic tape on top of the mouthpiece. Teeth vibrations will not bother the student and less tone will go directly to student’s inner ear. The student will hear more of the exact tone as it is produced by the instrument.
FORMING THE EMBOUCHURE
- Place upper teeth on mouthpiece.
- Think exaggerated, “A” to firm up lips to the teeth.
- Now add a, “Q” which will bring in corners of lips and result in even pressure of lips from top, bottom and sides.
Almost one half inch of reed will be inside of mouth. Air for clarinet is directed “at” the reed. Air for saxophone is more parallel to neckpipe of the instrument. Any uneven lip or facial tension will cause distorted tones. Tones will be thin if embouchure is too tight and tone will be a duck-quack if the embouchure is too loose. Lower teeth biting into lower lip will result in the bunched chin, a sore lip and thin tone. Keep lip pressure even and the lower lip controls comes from jaw strength, not from a bite of the teeth.
TONES
A fine tone is similar to a fine human voice. The purpose of air is to set the reed in motion. The reed has been soaked in water and fitted to the mouthpiece. The ligature screws are firm but not tight. Now, form the embouchure, breath deeply and start a flow of air through the mouthpiece. Speed up the air until tone has quality and volume preferred by teacher and student. SING THAT TONE! Match tones by playing and singing. Always think that the next tone you play is your best tone yet! The tongue is used lightly to stop reed vibrations. Air is brought to the reed at same speed and pressure that produced a good tone. Tongue is then released and a tone is heard. The throat remains open and relaxed. Keep tongue low and think of easiest way to touch tip of reed.
dah 1.Tip of tongue to tip of reed.
lah 2.Slightly back of tongue tip (1/4″) to tip of reed.
thaw 3.Tip of tongue touching lower teeth. Tongue is then arched to touch tip of reed.
Some suggest, “too,” “doo,” and “thu..” The “ah” keeps the throat more open. A tone’s release can happen by lightly touching tip of reed with the tongue or by stopping flow of air. Keep throat open and motionless in both methods of release.
Play and sing tones C2, B1, and C2, D2, and E2. Keep speed of air constant as if playing one long tone in a straight line.
![]()
Keep throat open (feel like a bass singer). Tones will change because the fingers move. Do not change tones because resistance to the air column changes. This is best approach to keeping C, D, and E in tune. A big change of tightness and air speed will cause sharpness in D and E when note goes from one finger to six fingers.
#1–CORRECT RESULT More often than not, a reasonable tone results. Imitation of your tone and pitch will be automatically attempted by the student. When it happens, it should sound like this:
#2–CHOKED SOUND
#3–WOBBLY SOUND
#42–ROUGH SQAWK
#5–BLOWS HARD
#6–WEAK, NASAL SOUND
#7–POOR INTONATION
Arms, hands, and fingers do not hold the instrument. Its weight is well balanced by the neck strap. Fingers are completely free to press and release keys. Play with fingers in a definite arched style as if student is holding a ball. (You would not catch a ball with straight stiff fingers) Do not “BLUFF”. We try to play next note before fingers are set. We let a bad note enter a line of technical notes because we do not have enough patience to be sure of that particular note. Technique is a problem of eyes, finger control, breath and tongue. One correct answer will solve a problem in mathematics. One correct rehearsal is only the beginning for music. It must be correct every time. Try to play a passage five times without a mistake.
Practice slow trills. The effort to lift a group of fingers is the same effort as needed to put down a group of fingers. Trills will give each finger and each combination of fingers an exactness that has no lost motion.
Practice scales. Brass students quickly think in terms of the skips or arpeggios that go with the valve combinations. Woodwind students think in terms of the diatonic scale. These combinations are awkward: E flat to E needs two finger movement, E flat to F needs three finger movement, E to F# to G# just does not fall easily. B to C# is easier than B to C. Work slowly. The eyes must recognize first. Then fingers must be taught to easily press or lift the keys.
TONE AND INTONATION
The great soloists will have one idea of tone. The great jazz artists will have their individual tonal characteristics. Yet, the section must fit into the band’s balance and technical proficiency. Saxophones can sound like French horns. They can fill in for the third clarinets. Tenors and Baritones can blend with the euphoniums. Remember that the “buzz’ of a wide reed instrument is easily heard. It will not blend.
Teachers must have their hearing checked. Can teachers hear a difference of two vibrations, three vibrations, etc. An examination will give confidence to the teacher in some areas of recognition and will show the teacher where work is needed in ear training, etc. Young wind players do better in flat keys. They are not confident in sharp keys. In other words, we feel best when we tune down and we are sure when we try to “tune up”.
Vibrato, phrasing, and interpretation are an extensive treatise beyond this Sax Embou-Sure article. So get the basics first and many of the other facets of playing will come easily.
Purchase Complete Embou-Sure Series


