
(Reprinted from G. Leblanc Corporation article from 1962)
The proper use of rehearsal techniques will result in an improvement of tone, intonation, balance, and blend in all sections of the band. There are many fundamentals that must be used consistently in each rehearsal.
1. ESTABLISH THE SOUND YOU WANT
Each director becomes known for the type of sound he has in his band. This sound depends on many things. First, it depends on the ability of students to play notes in tune and in rhythm. Secondly, it depends on the ability of students to play with ensemble feeling and with a flow to the phrase line. Thirdly, it depends on the ability of exposed passages (solos, trios, quartets, etc.) to come through in a mature and confident manner.
The woodwind sound of the band depends on the type of “CORE” of the tone that the director demands. This “CORE” should be in evidence in all woodwind sections. It is the purpose of this paper to give hints that the director can use in full rehearsal to establish unity in woodwind sounds.
A. FLUTE
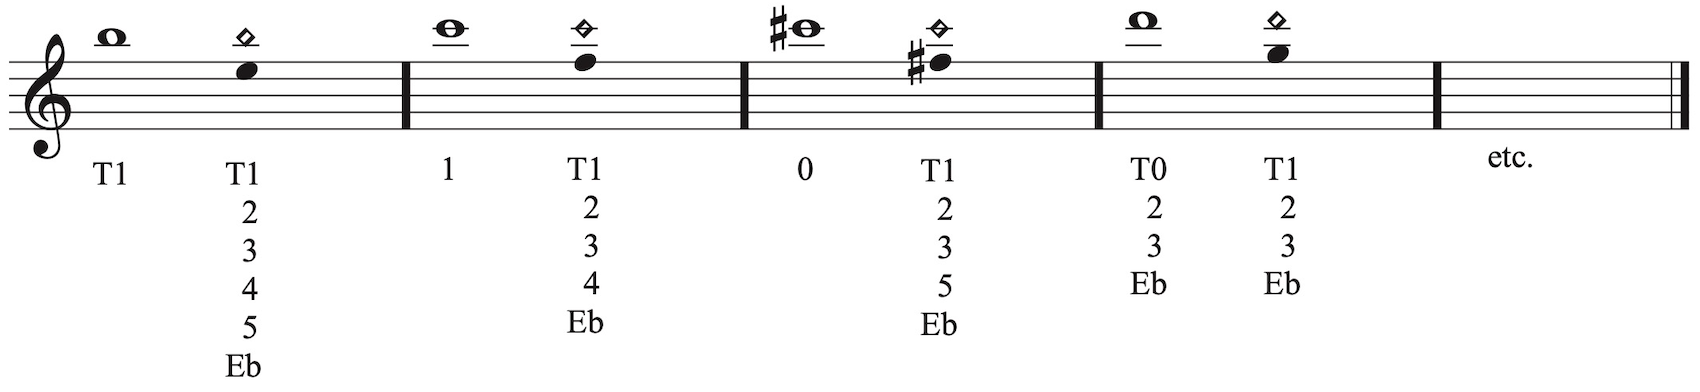
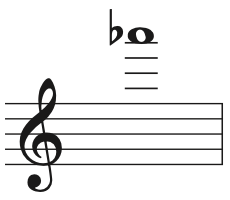
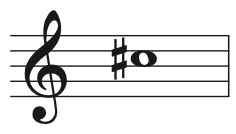
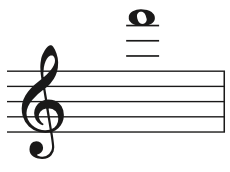
- Establish a core of the tone by use of harmonics. Play the following notes with one fingering.

- Use regular fingering for the following notes. Hold the sound to that of the first note. Example: Use fingerings of E in 2nd note but proper embouchure and breath support will produce harmonic B.
 References:
- The Flute Book – Leblanc Publications
- The Flutist Guide – Frederick Wilkins
- Harmonic Fingerings for the Flute – Arthur Brooke
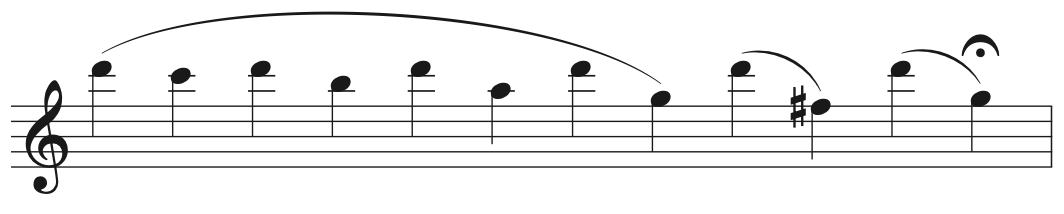
- Do the following exercises:
Play as loudly as possible with feeling that tone wants to jump an octave. Listen for an “edge” in the tone. Add the “hollow sound” by blowing more into embouchure opening. Close lips to keep tone from going flat.
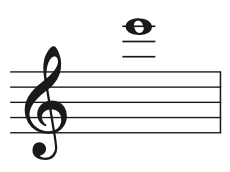
 Play as broadly as possible with feeling that tone wants to drop an octave. You will hear the bottom harmonic in tone.
- Checkpoints for flutes:
- Lower lip must be parallel to tone hole. It covers ⅓ of the opening.
- A tight lower lip forms a curve in relation to the tone hole. This tone will be “tight and windy.”
- The lower lip should be spread the full width of embouchure plate.
- If you can see the inside edge of tone hole the tone will be “windy.”
- Feel that corners of lips are relaxed and pulling downward.
- Upper lip may be tight for a brilliant tone or more relaxed for a full mellow tone.
- Lift head at end of phrase to avoid “flatting.”
- Tip end of flute “up” for lightness in diminuendo.
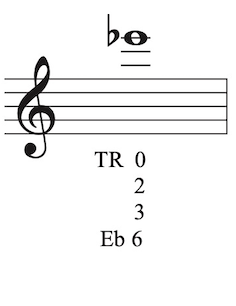
- You may find the following fingerings to be useful:
a. Add 2nd trill key.
b. Leave off Eb key to lower pitch.
c. Add fingers 5 and 6 to lower pitch.
d. Leave fingers 4, 5, and 6 down for pitch or to smooth technique if next note is higher.
e. Add finger 6 to lower pitch.
- Flip finger 3 down at the instant of attack to get quicker response on low notes.

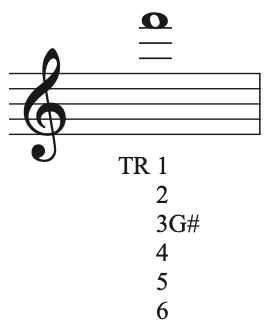
- Finger patterns for flute:
- Adjust bottom flute joint so that finger 7 will fall on low C with no wrist movement.
- Do not let little finger (left hand) drop below G# key.
- Do not lift fingers more than ½ inch.
- Do not let fingers 4, 5 and 6 ride rods of keys.
- Let flute rest on tip of right thumb. Fingers of right hand feel that they are leaning toward upper end of flute.
- Feel a lift in the right wrist. Finger action of right hand is similar to finger action on the piano (with less arch in fingers).
- TROUBLE CHART (The Flute Book-Leblanc Publications)
- Plays Sharp
- Wrong lip position – Turn flute in on lip, play with flute lower on chin.
- Head joint – Adjust to pitch with octaves remaining in tune.
- Plays Flat
- Wrong lip position –
- Flute is turned in too far on lip.
- Lip covers too much of tone hole.
- Wrong lip position –
- Generally Poor Intonation
- Combination of above – Student practicing for technique only, work for blend, and do tuning exercises.
- Weak Low Tones
- Tense lips, poor embouchure, flute leaks – Practice softly to relax lips, do exercise 3. (above)
- Breathy Low Tones
- Lip opening too large –
- Play high notes to establish small lip opening – play low notes with same opening but changed air direction.
- Lip opening too large –
- Harsh Upper Tones
- Lips too tense- Blow full tones with sagging corners of embouchure – blow more into flute for hollow sound – play softly with airstream forcing lips to open.
- Sluggish Fingers
- Poor hand and arm position, fingers are holding flute in tight manner –
- Play open tones to find easy balance of flute, play over break to relax little finger in right hand, do not let fingers ride key rods, practice scales, and trills.
- Poor hand and arm position, fingers are holding flute in tight manner –
- Slow Tongue Action
- Tense muscles, tongue stroke is too long, tonguing is too far back in mouth, too much flesh of tongue is used for attacks –
- Get the feeling that tongue releases air from the front of mouth. Many students play with feeling that air is pushed from back of mouth.
- Tense muscles, tongue stroke is too long, tonguing is too far back in mouth, too much flesh of tongue is used for attacks –
B. CLARINET
- Good tone usually results when these are combined:
- Flat chin.
- Smooth lower lip at point of reed contact.
- Corners of lips firm but not tight as in smile.
- Upper teeth on the mouthpiece.
- Breath support is kept “low.”
- Resistance of reed to air column is even in all registers.
- Resonance cavities are made use of (especially tongue placement).
- Flat Chin (tips to students).
- Whistle (this sets corners of mouth “in”).
- Smile or laugh (this flattens chin, smooths lower lip – then bring in corners of mouth).
- Feel that corners of lips are “shaking hands with mouthpiece.”
- Lower lip held in same position as when applying chapstick.
- Have students look at side of mouthpiece to see what happens when too much lip causes reed to close against the lay.
- Smooth lower lip at point of reed contact.
- Use first finger to demonstrate reed placement. The lower lip is smooth, finger then placed against the smooth lip, corners of lips then come in to close against finger. ½ of “red” of lip covers teeth. Finger presses against teeth and not downward against top of teeth.
- Corners of lips firm but not tight as in smile.
- A tight smile allows for air leakage. Habit of air leakage pulls breath support to upper chest and partially closes throat.
- Upper teeth on mouthpiece.
- If mouthpiece wobbles in a student’s mouth, it is a sign that student is either using double embouchure or that student allows mouthpiece to drop down from upper teeth. The mouthpiece has no firm anchor to upper teeth (jaw) which is stationary part of face.
- Breath support is kept low.
- This is a difficult habit to establish in young players. However, it is necessary if tone is even in all registers. It keeps throat open for full flow of fast air column.
- Resistance
- Resistance must occur for a “live” tone.
- Feel the clarinet “push back.”
- Air must move FAST to get resistance.
- If resistance is present all registers will have same feeling of richness and vibration.
- Resonance cavities are used.
- Search for vowel to use to bring about a clear tone. This can be an “arching” of the tongue. It can be gained by bringing the tip of tongue more forward. It can be gained by relaxing throat for a freer flow of air.
- Use Bonade Ligature to free reed response. (Tonguing will speed up.)
RECOMMENDED EXERCISES
- Crescendo on any note (best on low notes) to find point of good resistance and vibration.
- Play notes in “clarion register” without using register key.
- Slur in 12ths without tightening throat. Keep breath low. Keep tongue arched or well forward in mouth to use “ih” vowel sound.
- Exercises in “thirds” (from W.S.U. Music Department)
- Abato Exercises (from G. Leblanc Corp.)
C. BASS CLARINET
- Put more mouthpiece in mouth and use softer reed to avoid squeaking.
- Use mirror – see what is happening.
- Clarinet blows flat on FF level and sharp at the PP level. It takes more air pressure to keep good tones at PP level.
- The amount of firmness in corners of lips depends on tone you desire.
- Experiment with added fingers for pitch control in throat tones.
TONGUING (poor)
-
- Tonguing too hard.
- Moving jaw.
- Tongue too flat in mouth.
- Tongue pulling back in mouth.
- Too much tongue flesh touches too much reed surface.
- Too much “tee” is used.
- Requirements of tone are forgotten.
- No variations of attack are taught.
TONGUING (corrections)
-
- Establish good tone first.
- Use legato approach with only slight tongue movement.
- Transform this to spacing of notes by putting tongue back to reed .
- Speed tonguing up and notice that tongue returns to reed but air pressure remains constant.
- Alternate slurring and tonguing on same passage to maintain good tone.
- For moving jaw: have student practice tonguing with pencil held between teeth.
- Students with long tongue: Let tip of tongue lie gently at front of ‘mouth (close to bottom teeth or lip.) Tongue then touches reed. The tip of tongue will not touch the reed.
- Students with more of a common tongue: Tip of tongue will touch tip of reed or slightly below tip of reed.
- Stroke of tongue is short and relaxed.
EXERCISES
Exercise #1

-
- for little fingers
- for 1st finger (left hand)
- fingers 2, 3, 4, 5, and 6 start to reach down when student plays G
Exercises #2
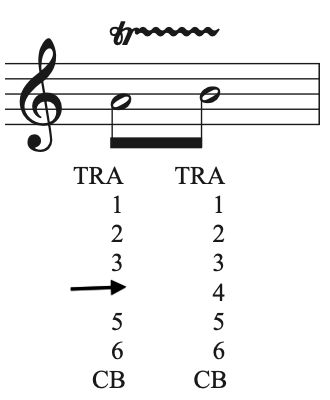
-
- trill with finger 4
Exercises #3: Keep feeling of using a firm “OH” when playing the throat Bb.
D. SAXOPHONE
- Good tone is very similar to that obtained on clarinet.
- Be sure lip is smooth under the reed.
- Use an “overbite” (similar to bassoon) for alto tone .
- Do not use excessive “bite”. This enlarges the natural intonation deficiencies of saxophone.
- Tune octaves on E, A, G and F. Adjust other pitches if needed.
- As an ensemble instrument:
- The saxophone supports sounds of other band sections. It is not to be heard as a section instrument.
- As a solo instrument:
- The saxophone must fill with quality and “core” of the tone. Eliminate the cutting reed buzz from soft reeds or from long lay mouthpieces.
- INTONATION PROBLEMS

do not adjust embouchure – make changes by adjusting jaw pressure.
- Sax problems
- Check for balanced key distance and balanced spring action (trills).
- Most students leave ligature too high on the mouthpiece.
- Insist on mouthpieces made of “rod rubber”.
- Keep fingers close to the keys – do not let little fingers “curl”.
- Do not play with head turned to the side.
- Low reed in instruments usually “hang over” on articulations. They must be taught to space notes.
- Reeds must be soft enough to articulate rapidly but not soft enough to sound like a short lay mouthpiece.
2. ESTABLISH A BALANCE IN THE WOODWINDS
The woodwind balance is the responsibility of the director. Many directors build up the band’s balance on brass sounds. Woodwind sounds are restricted to solo passages or, at most, a minor additive to the whole band sound. Other directors search for the richness that woodwinds can add to the chord. Many times this sound cannot be heard. It is a feeling of presence that extends the bass range downward (contrabass clarinet), or it can add to the “highs” like the sounds heard from the finest of tape recorders. For example: One note in the upper range will send a recording needle to the top of the distortion scale, while many notes in the low range will not settle to a feeling of stability.
Listen to woodwind sections by themselves. Does the alto sax line blend with 3rd clarinet? Do tenor and baritone sax blend with bass clarinet? Do flutes add to the soprano line, or are they effective only in solos?
Individual growth appears when students know they are responsible for their part. Full band sounds allow for bluffing in details. The rehearsal should be divided between section and full band playing.
3. TECHNICAL PROBLEMS
- BREATH SUPPORT. Here are four exercises to teach students to breathe low.
- Place an elbow on each knee while in a sitting position. Bring fingertips together at center of forehead. Breathe without allowing shoulders to move. The student gets used to feeling the breath low and deep before upper chest is filled with air.
- Place hands on side of body so the thumb is in small of back and first finger touches bottom rib (front of lower chest.) Lean over from waistline. Breathe without any movement in shoulders. The movement of air in the lower lungs will be felt in fingers.
- Raise arms above the head. Breathe without shoulder movement.
- Listen for throat sounds as student takes breath. Sound of air in throat means that throat is tight and breath is high in neck and chest.
- Use lots of legato warm-up to set a pattern of fat, low breath.
- FINGER PATTERNS
- Fingers should play the instrument
- Fingers are not to hold the instrument
- Weight of instrument is balanced throughout entire arms
- Thumb positions are very important
- Avoid a high arch in fingers
- Do not let fingers ride side rods
- Watch for “curling” of little fingers and finger number 6
- Write out exercises –
- Chromatic scales to the octave
- Diminished chords to the octave and a fifth
- Chromatics over the break
- Exercises for alternate fingerings
- Simple exercises into the upper ranges
- Practice four styles of fingering (slowly)
- A definite tap to the finger
- A high lift to the finger
- A smooth roll to the finger motion
- A low lift to the finger
- GENERAL OBSERVATIONS
- Selection of students
- Students with small chin (pointed) will have windy flute tone.
- Students with prominent, wide set jaw will have fine flute tone.
- Students with short upper lip will have windy flute tone.
- Students with a wide hand and short finger s will do well on small woodwinds.
- Students with long fingers will do better on large clarinets or bassoons.
- Selection of students


