
I. Embouchure
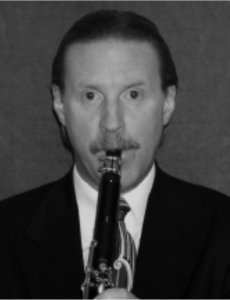
A good embouchure allows a clarinetist to produce a good sound, with correct intonation, with any articulation, in any register, without a noticeable embouchure change. (See Example 1).
A. Teach specifics – insist on “rightness”
- Lower lip over lower teeth. Feel teeth 1/2 way between the “pink” line and “wet” line.
- Mouthpiece between 1/4” and 1/2” in the mouth at approximately 30 degrees with the body. Keep head up!
- Upper teeth on the mouthpiece. Patch on mouthpiece often eliminates this problem.
- Drawstring in lips – pulls lips out and around the mouthpiece. Corners firm, but no smiling.
- Chin stays pointed as if blowing into a pop bottle.
- Upper lip stays firm.
- Breathe through corners of the mouth. Teeth do not come off top of mouthpiece!
- Cheeks will not puff out if corners are firm.
- Upward pressure into top teeth (see hand position).
- NO MOVEABLE EMBOUCHURES!
- Keep head up and clarinet at 30-degree angle to the body (See Example 2).
- Mouthpiece-barrel combination should produce a concert F#.
B. Problems associated with the embouchure
1. Firm upper lip 2. Firm corners 3. Firm chin 4. Lower Lip placement 5. Mouthpiece in mouth 1/2” – 1/4”
1. Small stuffy sound – usually too much lower lip, (or flesh) touching the reed.
a. bunched chin – insist on a firm chin. Pressure to hold the reed must be transferred from the muscles in the chin to those in the jaw.
b. too much lower lip in the mouth. See above A. 1.
c. check horn angle to the body. Too close – too much lower lip on the reed
d. check reed strength (see reeds).
e. check the amount of mouthpiece in the mouth. Too little does not give enough reed in the mouth to vibrate
2. Saliva in sound – check horn angle. Keep head up – horn down (30 degrees to the body). Bring music stand up higher to keep head up.
3. Wild uncontrolled sound
a. check reed placement (reed too low).
b. check the amount of lower lip in the mouth (too little lower lip will cause uncontrolled sound and squeaks).
c. check horn angle (30 degrees to the body).
II. Tongue Tip of Tongue only stops the reed from vibrating.
A. Tip of the tongue touches the tip of reed.
1. Tongue pressure should be no more than that necessary to stop the reed from vibrating.
2. “Finding” the tip of the tongue a. scratch tip of the tongue with fingernail or rub against the bottom of front teeth to locate exact tip.
b. place tip of the tongue on tip of reed outside the mouth.
c. bring mouthpiece into mouth keeping tongue in place on the reed.
d. form embouchure.
e. build pressure behind tongue – release reed.
f. touch tip of the tongue to tip of reed many times, denting the sound.
g. repeat above process but stop reed with the tip of the tongue.
h. remove the mouthpiece from mouth to check tongue placement.
3. Back of tongue should remain in “eee” position at all times. This will bring the tongue up and back such that the tip of the tongue can touch the tip of the reed. It is also fundamental to achieving characteristic tone quality and upper (altissimo) register.
4. Do not allow embouchure to move while tonguing.
B. How to recognize correct tongue and correct problem tongue.
1. No “TT” sound is present in articulation. Tongue releases the reed, it does not attack the reed.
2. There should be NO visible throat motion during articulation (See Example 2).
3. There should be no pitch change during articulation.
4. During rapid articulation, the tongue starts and stops the sound. Air pressure should not change.
5. How to correct
a. The student must be made aware of “correct” method of articulation.
b. above steps should be followed.
6. The tongue consists of a group of muscles that must be “exercised “ to respond correctly. An exercise should be used daily to strengthen tongue and good habits (See Example 8 and complete article on www. bandworld.org/free)
III. Hand position
A. Instrument must be played with pads of fingers, not tips.
1. Drop hand to the side, bring fingers up to instrument. Keep fingers relaxed. Collapsed “C” position. No squeezing!
2. Left-hand index finger should roll back to play “A” key. This finger should not be lifted to contact the “A” key and should be very close or actually touch the G# key (See Example 3a).
3. Right-hand index finger should not support the instrument. This finger should rest next to or slightly above Eb-Bb key in order that side trill keys can be 10 Steps to Better Clarinet Performance reached.
B. Thumbs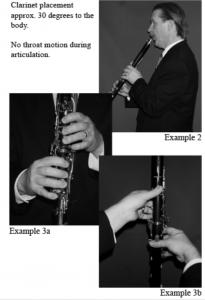
1. Left thumb should aim at the “2:00” position. Register key should be played with the side of the thumb, next to the nail (See Example 3b).
2. Thumb rest should contact the right thumb between the nail and first joint. Pressure should be up into upper teeth (See Example 3b). Neck Strap can be used!
C. Finger motion
1. Fingers should always remain close to the keys. This will help technique and aid in “over the break” passages.
2. Mirror practice must be encouraged.
IV. Reed placement and Reeds
A. Tip of reed should “always” line up with the tip of the mouthpiece.
B. Reed must line up on the table of the mouthpiece(watch butt as well as tip).
C. Pick right strength reed
1. Reed too thick – sound is airy, hard to blow. Can cause severe embouchure problems, especially the bunched chin.
2. Reed too thin sound buzzy, high notes flat or difficult if not impossible to produce.
3. Pick good nationally-known brand. Cheaper reeds are just that!

V. Tuning
A. Tune open G by adjusting between the barrel and upper finger joint. C’s should be tuned between the upper and lower joints. Basic tuning should be done between the barrel and upper finger joint. Right-hand pitches can be further adjusted between upper and lower joints.
B. Use tuning rings to close the gap and maintain constant setting.
C. Venting, dampening and mouth-throat motion should be used to fine tune pitch (See Example 4).
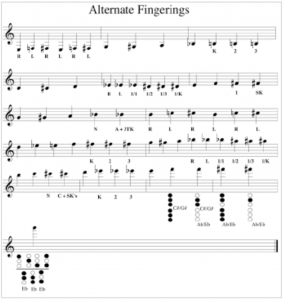
VI.Technique
A. SLOW PRACTICE!
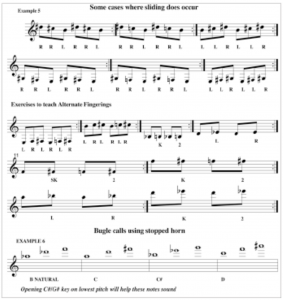
B. Learn alternate fingerings! (See Examples 5 and 6).
VII. High note production
A. More mouthpiece can be taken in the mouth to help produce the notes in the initial stages.
B. Keep tongue in “eee” position.
C. No biting!
D. Bugle calls (See Example 7).
E. Articulation in the high register requires much less tongue motion and tongue contact than those in the lower registers.
VIII. Equipment
A. Keep hands and mouth clean.
B. Clean instrument with swab, kleenex and handkerchief daily.
C. Keep small paintbrush in the case for weekly cleaning.
D. Use Q-tip for weekly tone hole cleaning.
E. Clean corks – wipe off old cork grease weekly.
F. Clean pads – cigarette paper.
G. Oil and clean keys use key oil or motor oil.
H. Oil bore on wood instruments at least once a month.
I. Assembly
1. teach specific method, one that will not bend keys or unseat pads.
2. watch for bridge key and side trill keys
3. grease corks!
IX.Warm-up
A. Importance of daily warm-up and practice routine cannot be overemphasized (See Example 8).
B. Measure the quality of warm-up by its effort at improvement.
1. Long tones
2. Tonguing
3. Scale studies
X. Air – The Basis of Tone
A. Laser beam air.
B. Soft sound is only less air, not less intense air.
C. “EEE” tongue position will focus air stream and help maintain rapid air speed.


