
The following exercises are intended to help new students of the oboe establish great breathing and articulation habits in order to properly support tone production when playing the instrument. These are designed to be used in tandem with most any of the standard beginning band instruction books. While those books provide a comprehensive approach to learning the language of music and develop great fundamental ensemble skills, less common instruments such as the oboe require some supplementary materials to ensure student success.
Building Airflow and Articulation
This first exercise is designed to be done away from both the instrument and reed, and should be completed at the beginning of each practice session until the habit of taking full, well-supported breaths has been achieved. It is important to note that the oboe requires a huge amount of consistent support, but not a huge amount of air! The value of a great breath is found in a more natural ability for the air to be pressurized in the exhale through the instrument when one has a surplus of air. Practice breathing and then pushing the air through a coffee stirrer even before using a reed!
- Set a metronome to quarter note = 56-60 BPM
- Without inhaling, exhale for 4 beats
- On the fifth beat, begin inhaling for 2 beats.
- Make this an expansive breath, filling up your entire abdomen. Sometimes, it is helpful to visualize our air filling our body as one would fill a cup with water, that is, from the bottom to the top!
- You should be as close as possible to capacity (lung) after the two beats.
- Hold the air in place for 2 beats, and then blow it out in a focused stream as if through a straw or coffee stirrer (or oboe reed!) over the course of 4 beats.
- Repeat the above process starting with the 4 beat exhalation, but on the fifth beat, inhale for 4 beats instead of 2.
- Exhale your air over the course of 6 beats.
- Finally, repeat the above process starting with the 4 beat exhalation, but on the fifth beat, inhale for 8 beats instead of 2.
- Exhale your air over the course of 8 beats.
The following exercise(s) are designed to be completed with the oboe (instrument and reed assembled), after you have warmed up your breath and air support!
First Articulation Study
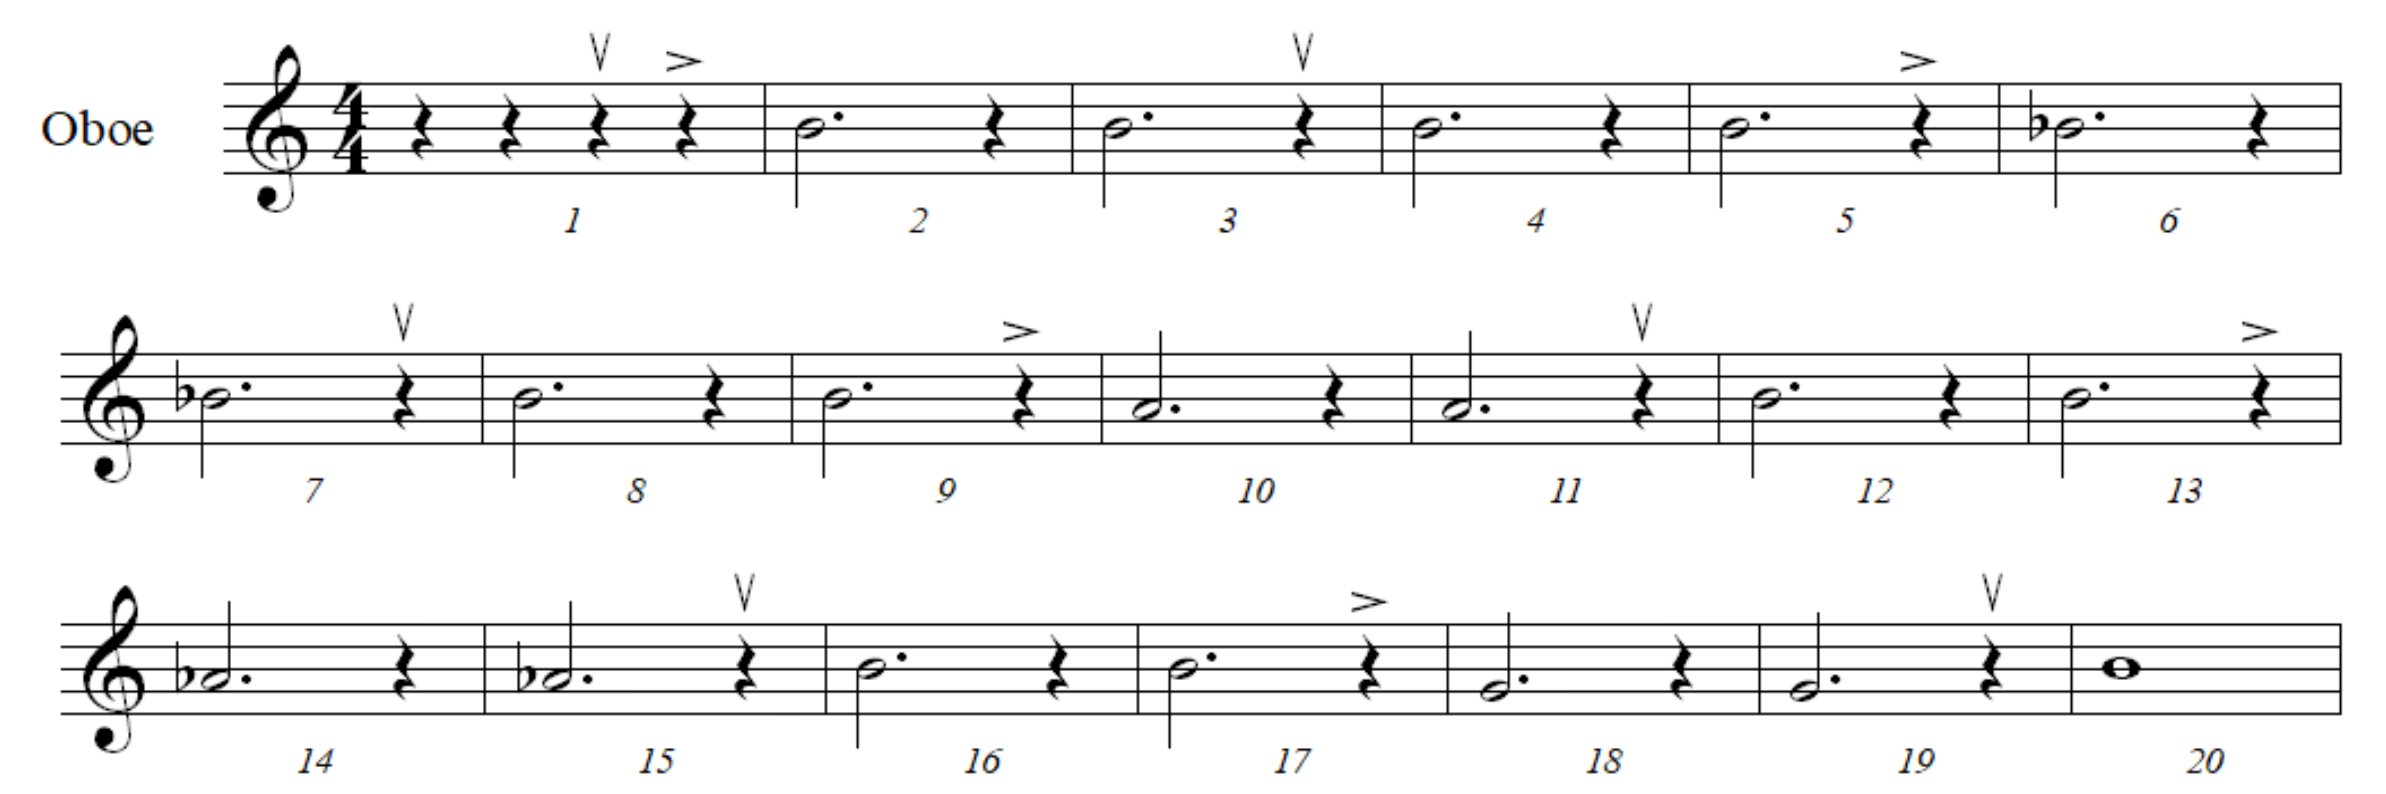
With a metronome set to quarter note = 60 BPM, play the above exercise with an emphasis on beginning and ending each note precisely. The downward arrows signify where to begin blowing, and the sideways arrows signify when to reset with a new breath. You will most likely not feel as though you need to take a breath every two measures, but try to use as much of your air as possible while producing sound. This should be played at a comfortable mezzo forte/forte dynamic.
Each note follows the same pattern of mechanism for beginning and ending sound production. Here are some things to keep in mind:
- While the metronome is already ticking, count off four beats before your intended first played note. Inhale on beat 3.
- On the final beat before your first note, bring the tip of your tongue to the tip of the reed and release your air as if you are blowing through the instrument but not allowing the air to pass through the reed because your tongue is blocking the tip opening.
- On beat 1 of the first measure, in time with the metronome, gently but quickly release your tongue from the held position and play the note, continuing to blow directed, supported air. Remember – blow air through the instrument, not at the instrument!
- To conclude the note, do not stop your air! Simply return the tip of your tongue to the tip of the reed.
Second Articulation Study
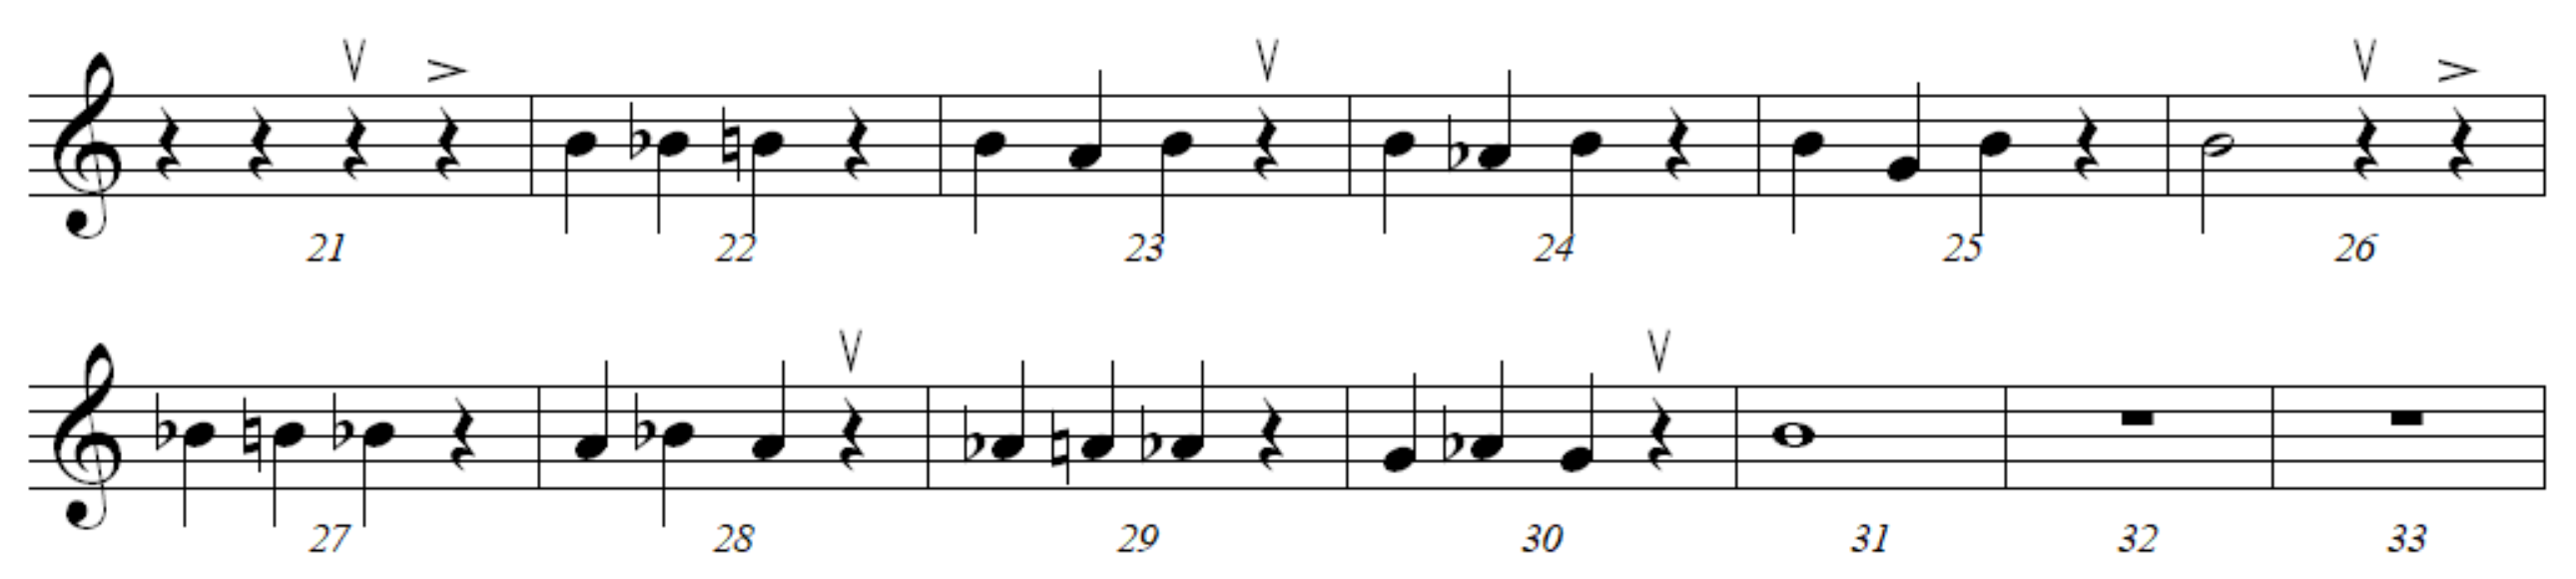
In the next exercise, we begin increasing mobility on the instrument and moving between notes while articulating. The metronome should still be set to quarter note = 52-60 BPM, but as you become more comfortable, gradually begin to increase the tempo according to your progress! The arrows carry the same meaning in this exercise as in the previous. You will most likely not feel as though you need to take a breath every two measures. Regardless, try to use as much of your air as possible while producing sound. This should be played at a comfortable mezzo forte/forte dynamic. Do not worry about being too soft!
A few things to remember:
- Even though the pace of the notes (quarter notes in this exercise vs. dotted half notes in the previous exercise) has increased, how we use our air does not change! Each breath should still provide you with the support to play two measures comfortably.
- Individual notes do not get individual pieces of air! The speed of our air remains unchanged as we play each quarter note. The same air that we use to play a long, sustained note (whole/half/dotted half) is the same air that we use to play shorter notes (quarter/eighths/sixteenths).
Beginning Scale Studies
Scales are the building blocks of all music! As such, it is of utmost importance that we build a comprehensive understanding of the scales that we will encounter in all the pieces we hope to play. In an effort to be as efficient with our practice time as possible, we will apply the same precision and attention to detail from our work with articulation to our study of scales. Remember to breathe deeply and expansively, practice with a metronome, and most importantly – make some beautiful music! All exercises, no matter how basic, are opportunities to create something unique and special!
Using the attached scale sheet (link here), choose a ‘scale of the day’. Once selected, make yourself familiar with the key and any of the accidentals associated with the key.
- Play the scale in half notes with a metronome set to 50-60 BPM slurring all notes, full range, at a comfortable mezzo forte/forte dynamic.
- Repeat the process, playing the scale in quarter notes at the same metronome marking. If this is too fast, go back to half notes. The purpose of this exercise is to build fluency in the key area of the scale.
- Once you feel comfortable with the scale, apply it to the rhythmic pattern below:
- Eighth notes
- Dotted eighth and sixteenth notes
- Sixteenth and dotted eighth notes
- Sixteenth notes
- Eighth note triplets
Remember! Make each scale musical. Remember your breath and create something beautiful!
- These rhythmic patterns are challenging! Be sure to keep the metronome going to ensure that you are playing each subdivision accurately. Feel free to break up the pattern into smaller pieces and alternate them per scale.
A word about the note ‘F’
From a teacher’s perspective, there are certain topics that pose unique issues to the beginning (and even advanced!) student. One such is the application of specific fingerings for notes on the oboe, which have multiple options or variants. Oftentimes, the first major scale that oboists learn is Bb Major; while this is not a challenging scale for many other band instruments, for the burgeoning oboist, this scale presents a myriad of issues. The note ‘F’ (f natural) is one of the most complicated to fully understand. Please reference the linked fingering chart for comprehensive explanations for ‘F’ in both the lower and upper octave of the oboe. Please note that the only difference between the fingerings from one octave to another is the addition of the first octave key. Here is a link to the fingering chart for your continued reference! It is not uncommon for students to be given instruments that do not have a left F key; this forces the student to learn some less-than-ideal habits, compounded by the fact that most beginning band music is written in flat-centric keys. The oboe is designed to play in D Major – the further we stray from D Major, the more finger acrobatics must be employed.
Regular F (Right F)
- Finger Position: Reference fingering chart.
- Uses: Smooth transitions when moving to or from E natural, F sharp, G natural, and G sharp
- When NOT to use: Following the notes D flat (c sharp), E flat (d sharp), and D Natural
- Considerations: Produces a more resonant and in-tune sound compared to forked F on some instruments.
Left F
- Finger Position: Reference fingering chart.
- Uses: Smooth transitions when moving to or from the notes D flat (c sharp), E flat (d sharp), and D natural.
- When NOT to use: Following the notes G sharp (A flat), left E flat.
- Considerations: Produces a more resonant and in-tune sound compared to forked F on some instruments.
Forked F
- Finger Position: Reference fingering chart.
- Uses:
- Helpful to avoid awkward “sliding” motion of the left-hand pinky when passages with E flat and D flat are involved.
- Can sometimes be helpful for softer, delicate entrances.
- Considerations:
- Can sound slightly dull or flat on some instruments and reeds.
Exercises for the Note ‘F’
Part 1
- Place a drone of the note ‘F’ (f natural) on at a volume that is audible to you even while you are playing.
- Play the note ‘F’ with the ‘right f’ fingering.
- Without the note stopping, switch your pinky fingers and continue the note using the ‘left f’ fingering.
- Repeat this at speeds, trying to maintain pitch and a steady sound.
Part 2
- Using an E flat Major scale, play the scale in quarter notes alternating between using ‘left f’ and ‘forked f’.
- Pay close attention to the difference in timbre (sound) as you use different fingerings for the note.
Part 3
- Set a metronome to quarter note = 60 BPM
- Beginning with half notes and working up to sixteenth notes, practice transitioning from the following notes to the note ‘f’ using the appropriate fingering when applicable
- D flat
- D natural
- E flat
- E natural
- G natural
- A flat
- Be careful to eliminate ‘blips’ or excess noise in the transition from each note to F. Pay close attention to your left index finger as you move on and off the half-hole.
Major Scales + Interval Exercises
I once had a teacher who imparted an insightful bit of musical knowledge to me while I was a very young oboist. At the time, the statement did not truly resonate with me, but as I matured, I found the true value of its meaning. My teacher said, “If you have successfully practiced all your scales, then you have already played all the notes you will ever play!” How could this be? At the time when my teacher said this to me, I barely played the oboe for barely a full calendar year! What did they mean by, “You have already played all the notes you will ever play?”
What my wise mentor meant was that if I had truly devoted myself to practicing scales in all their iterations and formulations, I would have worked through most of the combinations of notes that I would encounter in further study of Western Classical Music.
In order to accomplish this monumental task, we must ‘break’ our scales into patterns of intervals. Those intervals are the building blocks of the scales themselves: second, thirds, fourths, fifths, sixths, and sevenths! The exercise below is presented based upon a D Major scale broken into intervals of thirds. The same exercises should be applied to scales broken into the other aforementioned intervals.

- Set a drone to the tonic (starting pitch) of the scale you have chosen. (Scale of the Day!)
- Set your metronome to a reasonable tempo allowing for accurate execution.
- Play the scale in the broken intervals, slurred over the full range of the instrument, to the best of your ability.
- Alter the articulation while maintaining clarity of each note.
- Staccato
- Legato
- Marcato
- Incorporate dynamics into the exercise.
- Crescendo on the way up
- Decrescendo on the way down
- Decrescendo on the way up
- Crescendo on the way down
- After completing the scale in one broken interval, choose another (4ths, 5ths, 6ths, 7ths, etc…) and repeat the process.
- Alter the articulation while maintaining clarity of each note.


