
Page 25 - Bandworld Magazine 2015
P. 25
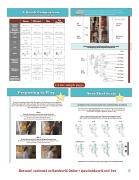
A Quick Comparison
Bassoon vs. Other Woodwinds
Bassoon
Bb Clarinet
Flute
Alto Saxophone
Instrument Family
Woodwind
Woodwind
Woodwind
Woodwind
Maximum
Number of Fingers Used for Keys
10!
(Right Thumb used for several designated notes)
9!
!
(Right Thumb Used as Balance)
9!
!
(Right Thumb Used as Balance)
9!
!
(Right Thumb Used as Balance)
Reed
Double Reed
Single Reed
No Reed
 (Tone Hole)
Single Reed
Clef
Bass! Tenor! Treble
Treble
Treble
Treble
Pitch
Concert Pitched Instrument
Bb Instrument
Concert Pitched Instrument
Eb Instrument
Range
Approx. Pitch Created on Mouthpiece
Reed with Bocal!
!
C
Mouthpiece and Reed!
C!
Head-joint Only! (Stopped or Open)!
A!
Mouthpiece and Reed!
A!
Embouchure Formation
Relaxed in Jaw! No Teeth Touching Mouthpiece (Reeds)! Lower Lip Slightly Rolled In! Slight Overbite
Firm Lip Corners! Top Teeth on MP! Lower Lip Slightly Rolled In!
Flat Chin! Mouthpiece Angled Downward
“Whee-Too”! Flat Lower Lip! Lip Corners Firm
1/2 Inch of Reed In Mouth! Mouthpiece Straight Out!
Top Teeth on MP! Exaggerated “A” then “Q”
Written pitch created when six fingers are down
G
No Reg. Key- G! W/ Reg. Key- D
D
D
The bassoon provides the player with great variety, as it has a varied functions within any ensemble. It sometimes serves as accompaniment but frequently has beautiful melodic and solo lines.
Left Thumb
Right Thumb
Whisper ! Key
Pancake ! Key
When ‘half-hole’, top half of tone hole becomes uncovered !
Left Hand ! Fingers
Right Hand Fingers
Compare the above and below graphics to understand the fingering chart diagrams in this book
Left Thumb
Right Thumb
LEFT 1st Finger 2nd Finger 3rd Finger 4th Finger RIGHT HAND 1st Finger 2nd Finger 3rd Finger 4th Finger
Bassoon! Page "8 Bassoon! Page "11 1/4 size sample pages
Bassoon! Page "20 Bassoon! Page "24 Bassoon! continued on Bandworld Online • www.bandworld.org/free
25
Preparing to Play
The goal in preparing to play and body position is for the bassoon to stay supported without having to hold it with your hands. This will allow it to be balanced without any tension and will allow your hands and fingers to focus solely on working the keys, rather than supporting the instrument.
Step 1
Place the seat strap on front of chair, sit and attach reed!
The strap should be placed about 1/3 of the way from the front of the chair. ! The goal is to create that perfect balanced position. !
Adjust the strap position until you find that spot for yourself.!
!
Step 2
Hold the Bassoon with Left Hand and Bring the Bassoon to You!
Be sure you are sitting up straight, with good posture, then bring the bassoon to you, ! rather than bringing your body to the instrument.
Your First Scale
! REMEMBER TO FULLY SOAK YOUR REED FOR 2-3 MINUTES BEFORE ATTEMPTING!
Now that you have given the embouchure a try, a good way to test it is by making your first sound on your reed and bocal alone. Take out your tuner. The pitch created should be around a C. It might be slightly flat, but that’s okay
Now, try this first scale. It is an F scale, with a B-natural instead of a B-flat. ! Later you will learn the B-flat, but for now, lets just get your fingers moving.
1) F 2) E 3) D 4) C
5) B (natural) 6) A 7) G 8) F
Repeat this scale several times, slowly, until you begin to feel comfortable with it!
